If you’ve ever had to zip images because the original files were too large to send over email, you’re already halfway to understanding why GZIP compression is crucial to faster page load times.

In this post, I’ll explain what GZIP compression is and how it works. Then, I’ll walk you through three ways to enable GZIP compression on your website, including modifying the .htaccess file and using a WordPress plugin.
Table of Contents
- What is GZIP compression?
- What is GZIP?
- How does GZIP compression work?
- The benefit of GZIP compression
- Why Do We Use GZIP Compression?
- How To Check GZIP Compression
- How To Enable GZIP Compression: 3 Methods
- GZIP Compression: A Free Way to Speed Up Your Website
What is GZIP compression?
GZIP is a popular compression technology for making files (primarily text) smaller so that they transfer more quickly over the internet. Website owners enable GZIP compression on their servers to speed up page load times and make visitors happier.
What is GZIP?
The term “GZIP” can refer to a few different things:
- The compression method
- The software used to compress files with this method
- The file format that results from GZIP compression (usually indicated by the file extension .gz)
GZIP is the current standard for file compression on the web. Research by W3Techs shows that, as of November 2024, 49.5% of websites employ GZIP.

GZIP was introduced in 1992 and originally intended for use by the GNU operating system (hence the “G” in GZIP) as a free and open-source alternative to proprietary compression methods at the time. This accessibility contributed to GZIP’s ubiquity.
But let’s zoom out a bit so you can understand what compression is and why it matters for your site’s speed.
In broad terms, compression is the process of reducing file sizes using a compression algorithm. A compression method can either be lossy, meaning some information is lost in the compression process, or lossless, which means all information from the original file is preserved in the compressed file.
Here’s why file compression is relevant to your website: At its core, a website is a group of related files stored on a web server. When you visit a website using a web browser, the browser sends a request (typically an HTTP GET request) to the web server that hosts your desired content.
The server processes your request, retrieves the right files from its database — including HTML and any associated CSS, JavaScript, and media files — then sends the files to your browser as an HTTP response.
Finally, your browser renders the files into what you see as a web page.
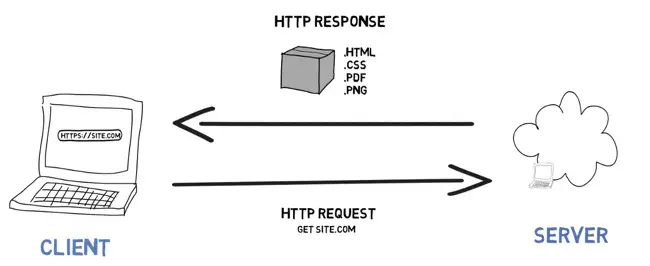
This might seem like a lot of work to load a cat video, but it’s true — every time you load a page, a web server must transmit all the necessary data to your computer.
Each data transfer requires some amount of time, largely depending on the size of the transferred files — the more data there is to send, the longer it takes for a page to load in your browser.
According to HTTP Archive, the median size of a data transfer like this is around 2,000 kilobytes, the data equivalent of roughly 100 pages of plain text. With media-heavy pages, the size can be three to four times larger.
How, then, do we keep the internet fast? The solution, as you may guess, is that web servers compress files before sending them to browsers — they turn our 100-page text document into more like a 30-page document.
The reasoning is simple: Smaller files mean less work that servers and browsers need to do to transfer them. Once the browser receives the compressed response, it quickly decompresses the contents, and we see a faster load time.
Compression works well with code like HTML because its syntax is repetitive — compression algorithms generally work by finding repeated information in a file and abbreviating it somehow.
HTML uses tags like <div> and <p> over and over, and compression methods work to temporarily eliminate these repetitions and shorten files — GZIP is one such method.

Custom Domain Connection with HubSpot
Inspire consumer trust and brand recognition by connecting your custom domain to your website for free.
- Connect a custom domain to your website for free.
- Keep your brand consistent across channels.
- Allow customers to find you online.
- And more!
How does GZIP compression work?
In essence, GZIP implements the lossless DEFLATE algorithm, which locates and removes duplicate characters on text files.
Perhaps you can recall a time when you tried to attach an image to an email but got an error saying it was too large. Or maybe the email took a long time to send because the attachment was so big.
You probably compressed the image and sent it as a ZIP file to resolve the slowness. Then, your recipient opened the email, downloaded the ZIP file, and decompressed it so they could see the image on their screen.
While GZIP is not the same as ZIP, it’s a similar concept. Instead of compressing images so they attach faster to an email, GZIP is largely used for compressing text files so they get sent faster to the browser.
“GZIP allows you to send larger files more efficiently by making them smaller and therefore faster across all the connections of the Internet,” explains Shane Larrabee, founder of FatLab Web Support.
Once the file reaches its destination (your website visitor’s browser), the browser decompresses it and shows it to the end user.
The benefit of GZIP compression
The main benefit of GZIP compression is that it speeds up page load times by making files smaller.
“So it's a much faster user experience,” says Larrabee, “which then, of course, helps with conversions and online experiences, and, of course, the big one, which is Google years ago started saying that speed matters.”
That last point about speed cannot be understated. According to Google, an increase in page load time from one to three seconds increases bounce rate by 32% — that’s a significant portion of your audience heading elsewhere due to just a bit of lag.
If you’re trying to speed up your page load time, grab this free website optimization checklist to see what other steps you can take.
Why Do We Use GZIP Compression?
GZIP is effective, but it’s not the only compression method out there. In fact, it’s not even the best method in terms of size reduction.
GZIP can reduce the amount of data by up to 70%. Not bad, except tests comparing compressed file sizes across different compression algorithms have shown that alternative algorithms like Brotli outperform GZIP for text-based assets.
If this is true, why do we still rely so much on GZIP?
The main reason is that GZIP tends to be faster than comparable methods. It compresses files in a fraction of the time that other methods take. This speed is crucial for data transfers over the web. After all, the point of compression is to speed up websites — what’s the point if the compression itself slows things down?
GZIP compression also uses fewer resources than comparable methods. It requires relatively little computing power and temporary memory space to work.
Larrabee adds that both Brotli and GZIP are often used side by side. “Brotli is newer,” he says. “Technically, the compression is better, but it's not replacing GZIP as of yet.”
But it is catching up. As of November 2024, W3Techs stats show that, of all websites that use compression, 56.6% use GZIP and 45.2% use Brotli (note that some websites could be using both).

How To Check GZIP Compression
For a file transfer to work with GZIP, two things must happen.
First, the web browser tells the web server that it can accept GZIP-compressed files. This is accomplished by including the Accept-Encoding HTTP header in the browser’s request:
Accept-Encoding: gzip, deflateMost browsers today include this header in requests by default.
Second, the web server processes this header and decides to either compress the requested files or leave them be. If the files are compressed with GZIP, the server includes the following header in its response:
Content-Encoding: gzip… which tells the browser that the files must be decompressed with the GZIP method.
If you want your website files to be sent in compressed format, you must enable your server to handle GZIP requests.
Your site’s web server may or may not have GZIP compression enabled by default, depending on your site’s configuration. Lucky for us, it’s easy to check without unpacking your server’s contents.

Custom Domain Connection with HubSpot
Inspire consumer trust and brand recognition by connecting your custom domain to your website for free.
- Connect a custom domain to your website for free.
- Keep your brand consistent across channels.
- Allow customers to find you online.
- And more!
Here are a few ways to find out:
Your Web Hosting Provider
Finding out if GZIP is enabled on your server is as easy as filing a ticket with your web hosting provider or using the live chat. This is absolutely something your host should know.
WordPress Plugin
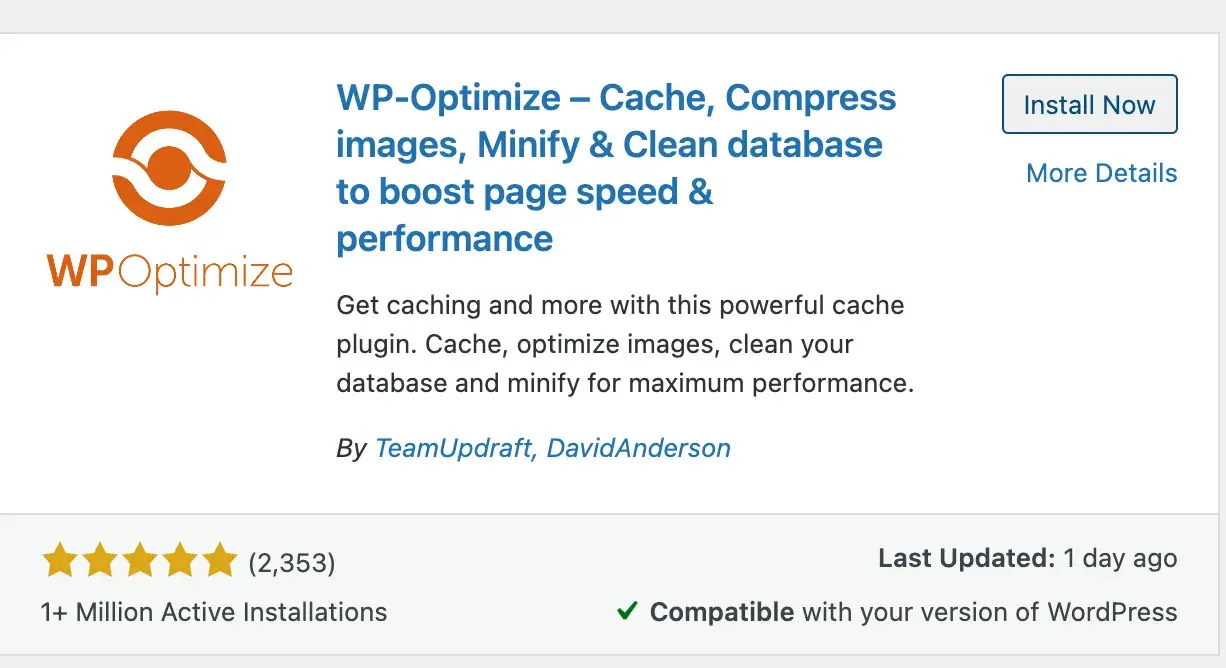
If your website is on WordPress, you can install the free version of the plugin WP-Optimize, and it will tell you if you have GZIP enabled. Here’s how:
Install and activate WP-Optimize.
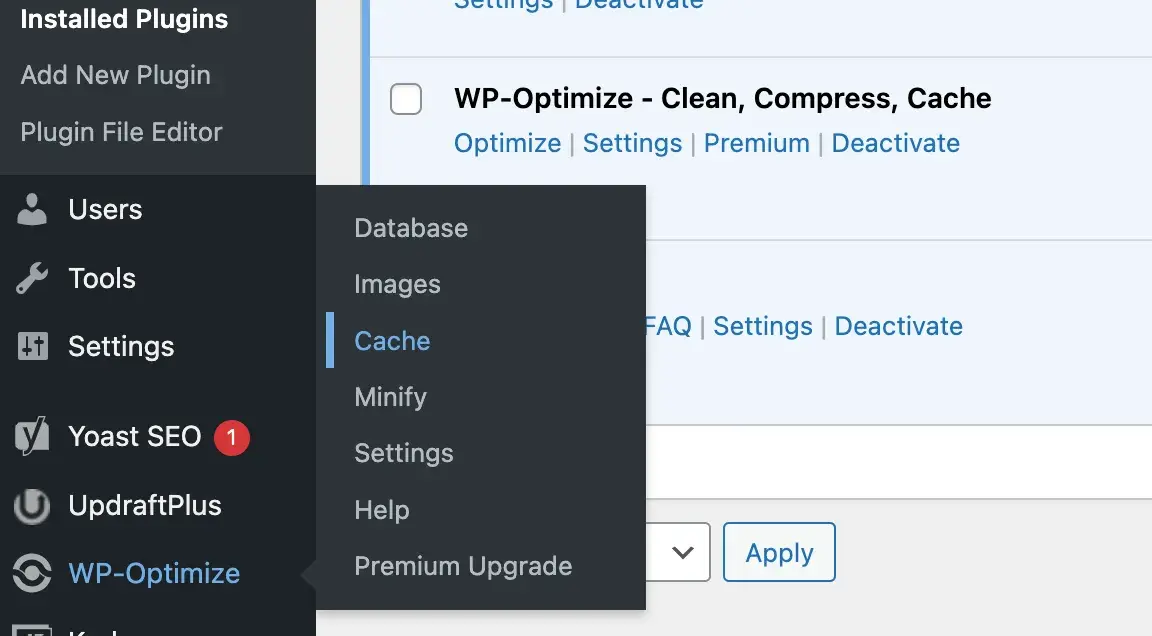
In your lefthand menu, hover over “WP-Optimize” and select “Cache.”
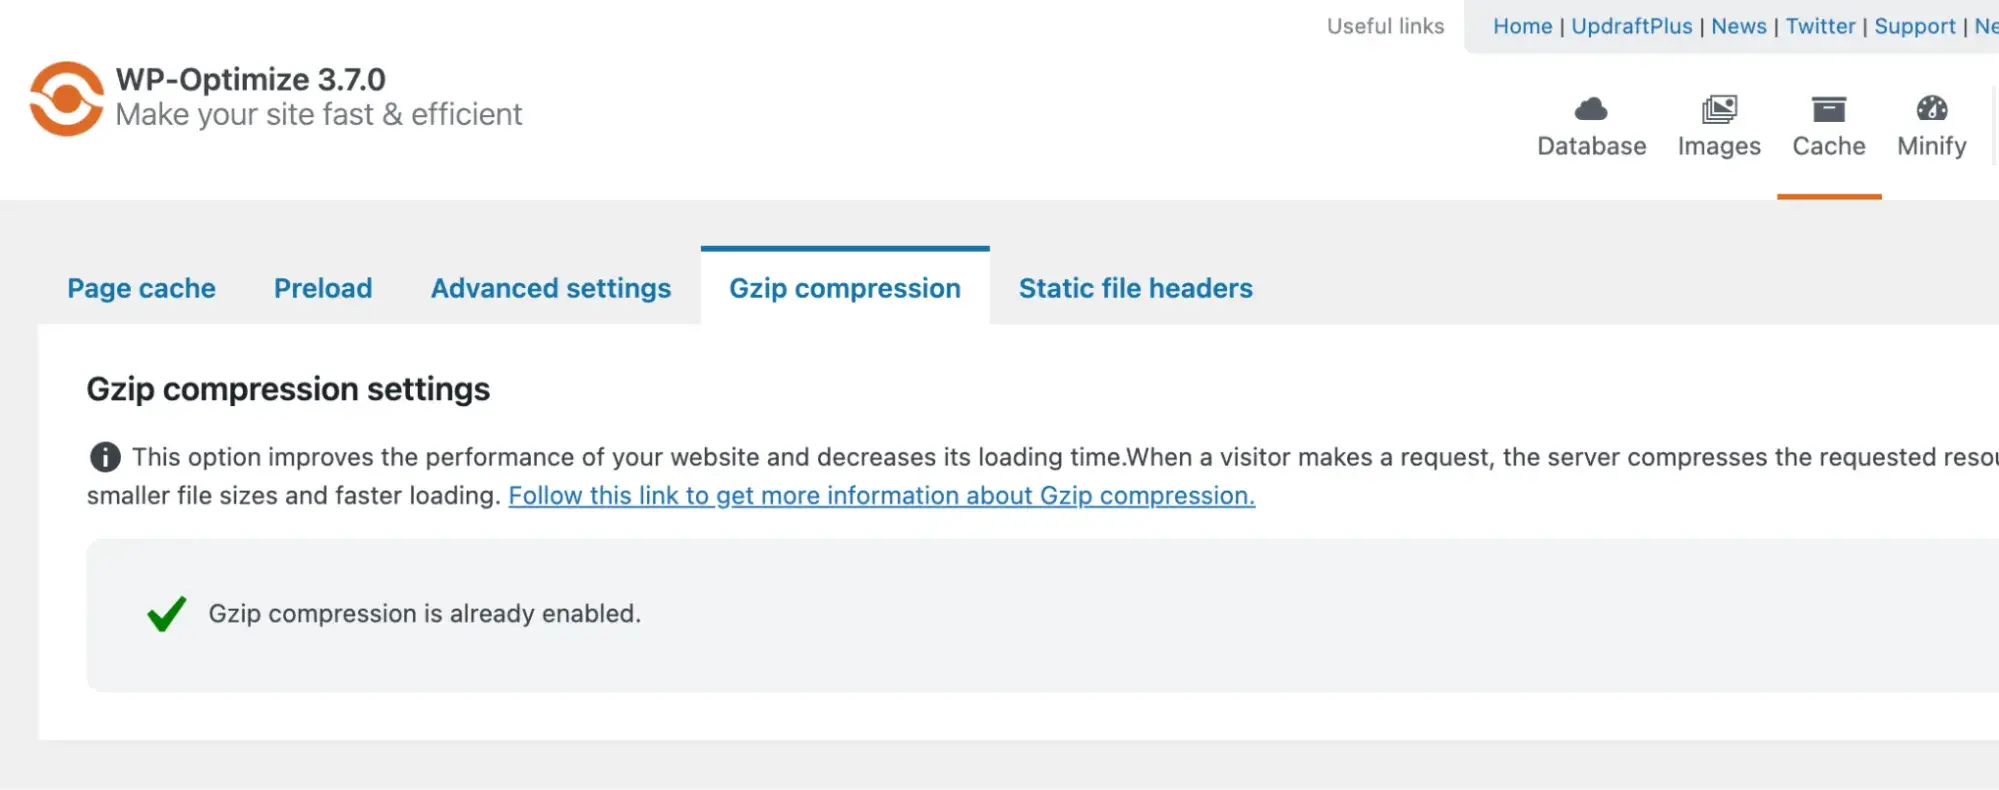
Then, click the “Gzip compression” tab to see if GZIP is already enabled for your website.
Online GZIP Compression Test
Many free websites will confirm if GZIP is enabled — just paste the URL of a webpage and see your results. Some websites will also provide a brief report explaining how much GZIP reduced the file size:

Online Speed Test
Many free speed tests like Google’s PageSpeed Insights and Pingdom include a recommendation to use GZIP on certain files if necessary. Here’s a warning from the Google PageSpeed Insights tool:

Note that PageSpeed Insights and Pingdom might still recommend GZIP compression even if you already have it enabled on your site. So, they’re not the best tools for determining if GZIP is implemented correctly. Instead, they should be supplemented with other tools on this list.
Check the HTTP Header in Developer Tools
To check for GZIP compression without an external tool, you can use the developer tools panel in your browser. Most browsers let you inspect page elements and view performance information this way.
First, load the web page you want to check in your browser. Then, open the developer tools panel and select the Network tab.
You’ll see a list of all the resources sent by the web server (if not, you may need to reload the page). Click one resource to view its contents.
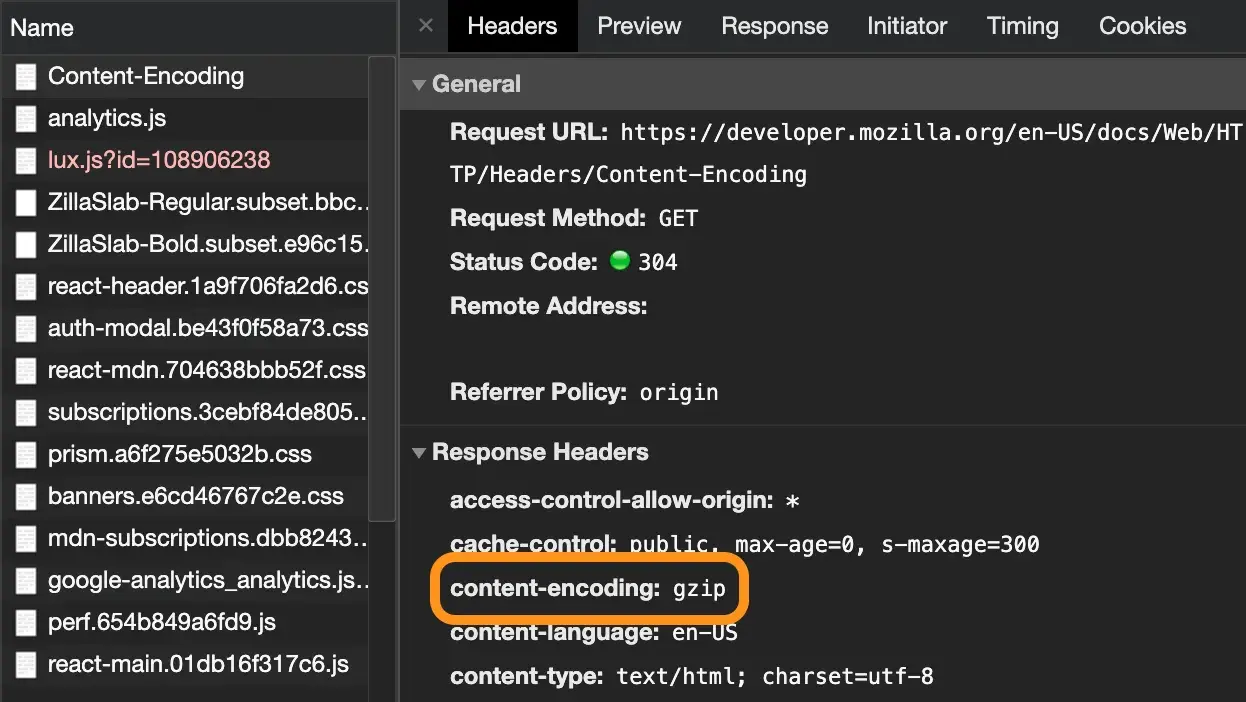
Make sure you have the Headers tab selected, then scroll down to the content-encoding header to see which method was used.
Here’s what a resource compressed with GZIP looks like using Chrome Developer Tools:
How To Enable GZIP Compression: 3 Methods
Since GZIP compression happens on the web server, the configuration process will depend on your hosting provider and server architecture.
“A good host should have this turned on on its own,” says Larrabee, whose web hosting company has GZIP enabled by default for all websites on its servers.
“We use Brotli, we use GZIP, all day, every day,” he adds.
Similarly, HubSpot’s CMS automatically applies Brotli compression to text-based files, but if a browser doesn’t accept this, HubSpot will use GZIP instead.
I also did some digging and found that, according to its knowledge base, Hostinger fully supports GZIP compression but does not enable it by default. Instead, Hostinger customers must modify .htaccess files or use a plugin (I’ll describe both methods below).
The same is true for InMotion Hosting, which already has the mod_deflate module installed on its shared hosting but not enabled by default.
All this to say, it’s worth checking with your web host.
If GZIP compression is not implemented on your web server, check your hosting provider’s documentation for instructions on enabling GZIP compression before trying the methods below. Your host may not recommend or even allow you to modify server files.
If you do have this permission, here are some solutions for common web server setups:
How To Enable GZIP Compression on an Apache Web Server
Those with websites on Apache servers can enable GZIP compression via the .htaccess file, which controls various server permissions. Add the following code to your .htaccess file, then save the file:
<IfModule mod_deflate.c>
         AddOutputFilterByType DEFLATE application/javascript
         AddOutputFilterByType DEFLATE application/rss+xml
         AddOutputFilterByType DEFLATE application/vnd.ms-fontobject
         AddOutputFilterByType DEFLATE application/x-font
         AddOutputFilterByType DEFLATE application/x-font-opentype
         AddOutputFilterByType DEFLATE application/x-font-otf
         AddOutputFilterByType DEFLATE application/x-font-truetype
         AddOutputFilterByType DEFLATE application/x-font-ttf
         AddOutputFilterByType DEFLATE application/x-javascript
         AddOutputFilterByType DEFLATE application/xhtml+xml
         AddOutputFilterByType DEFLATE application/xml
         AddOutputFilterByType DEFLATE font/opentype
         AddOutputFilterByType DEFLATE font/otf
         AddOutputFilterByType DEFLATE font/ttf
         AddOutputFilterByType DEFLATE image/svg+xml
         AddOutputFilterByType DEFLATE image/x-icon
         AddOutputFilterByType DEFLATE text/css
         AddOutputFilterByType DEFLATE text/html
         AddOutputFilterByType DEFLATE text/javascript
         AddOutputFilterByType DEFLATE text/plain
          AddOutputFilterByType DEFLATE text/xml
</IfModule>
This will compress all HTML, CSS, JavaScript, XML, and font files. After saving, check your compression with any of the methods described in the previous section.
How To Enable GZIP Compression on an NGINX Web Server
NGINX server software only compresses HTML files by default. If your server uses NGINX, you can enable GZIP compression on your site’s files by opening your nginx.conf file and finding the following line:
gzip on;Directly below this line, paste the following code:
gzip_vary on;
gzip_types text/plain text/css text/xml text/javascript application/x-javascript application/xml;
gzip_min_length 1000;
gzip_proxied no-cache no-store private expired auth;
Then, save the file and reload your NGINX configuration before testing compression.
gzip_types specifies the file types that are compressed. You can add or remove items from this line as you see fit. gzip_min_length is the minimum length that the response must be to be compressed.
Here, it’s set to 1000 bytes (one KB), but this can be changed if desired.
How To Enable GZIP Compression in WordPress
WordPress is CMS software, not a server configuration. However, if you run a WordPress website, you can install a performance plugin that modifies server files for you.
This is possible with a free plugin like PageSpeed Ninja.
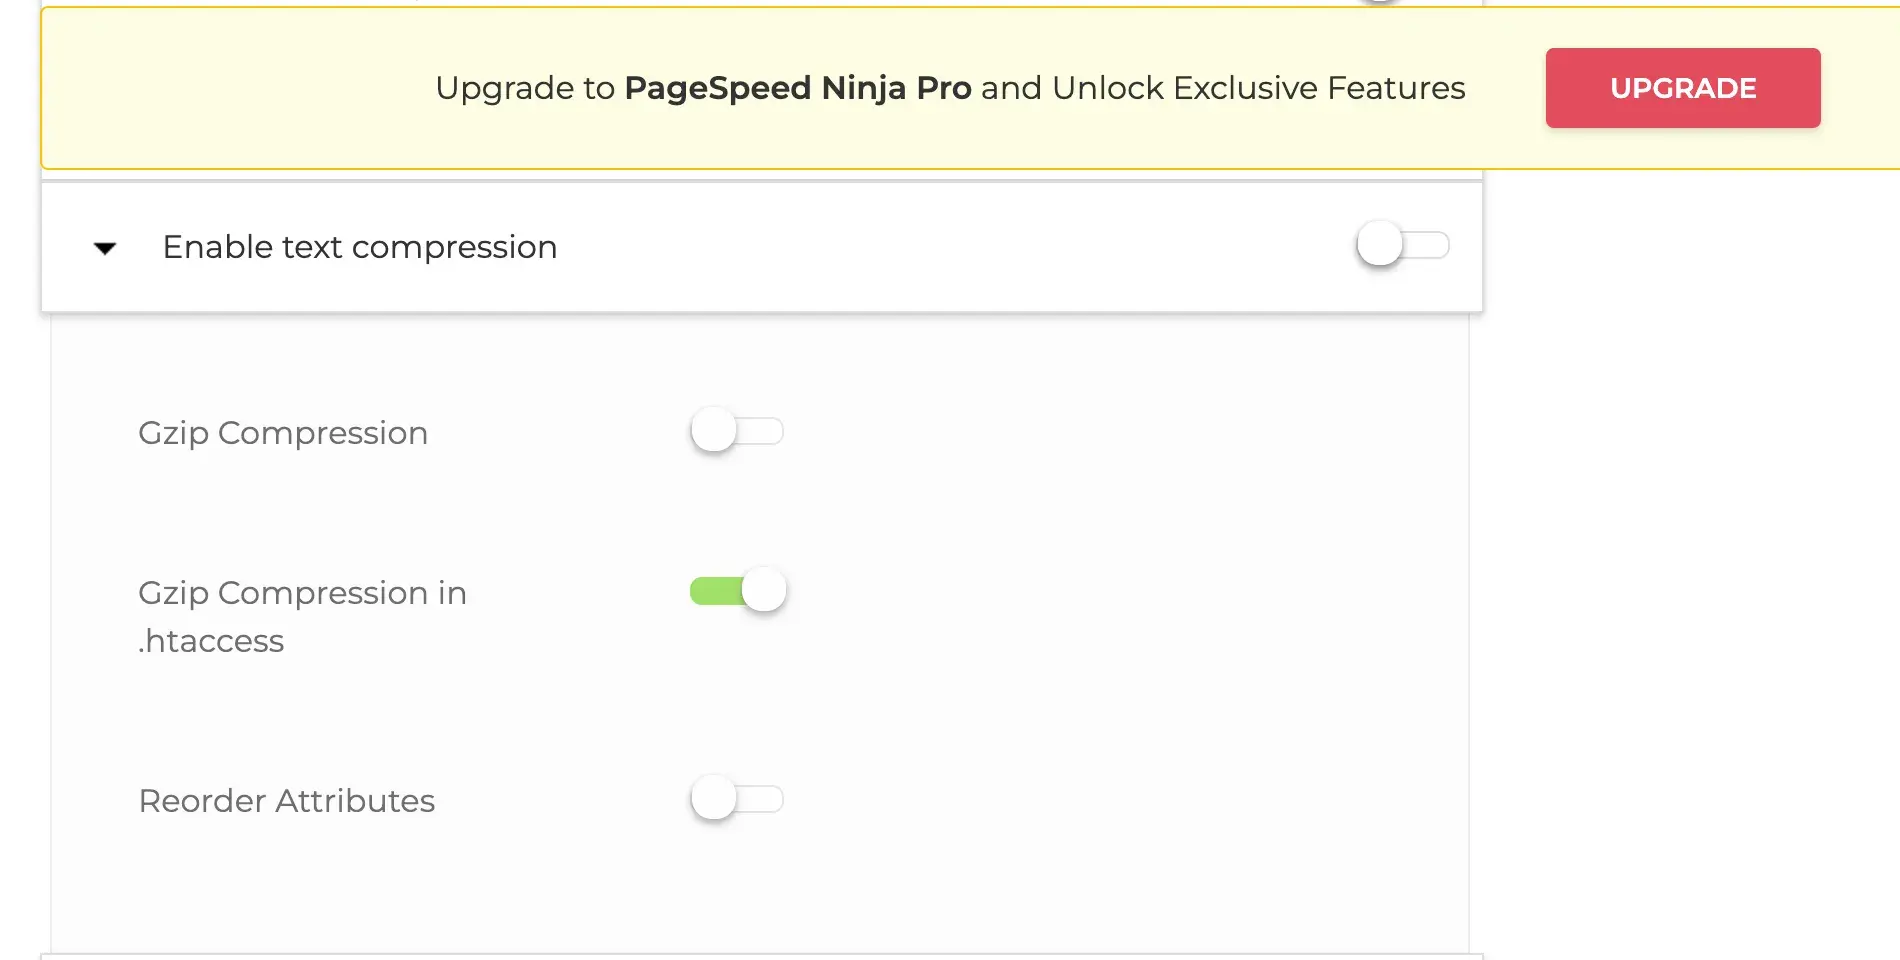
WP Rocket is another option, but it is a paid plugin.
Again, just because you can install and use a plugin doesn’t mean you have permission to change your server’s configuration. Consult the proper documentation or contact your host if you encounter problems enabling GZIP compression this way.
GZIP Compression: A Free Way to Speed Up Your Website
Remember, the goal of all of this tech talk is to give your visitors the best user experience possible by delivering the fastest pages possible. “Speeding up a site” may seem like a black box if you’re unfamiliar with what actually affects website performance in the first place.
By implementing compression on your web server, you’ll give visitors the speed they want at no extra cost. You’ll also capture more impressions, drive higher engagement, and convert more visitors into customers.
But there’s more to page speed than GZIP. Check out this free website optimization checklist to find out what else you can do to improve.
Editor's note: This post was originally published in December 2020 and has been updated for comprehensiveness.

Custom Domain Connection with HubSpot
Inspire consumer trust and brand recognition by connecting your custom domain to your website for free.
- Connect a custom domain to your website for free.
- Keep your brand consistent across channels.
- Allow customers to find you online.
- And more!

![How Google PageSpeed Insights Boosted My Website Speed [Test Results]](https://www.hubspot.com/hubfs/GooglePageSpeed.png)


![The HubSpot Blog’s 2023 Web Traffic & Analytics Report [New Data]](https://www.hubspot.com/hubfs/Web%20Analytics%20Traffic.png)
