AWS PrivateLink traffic filters
editAWS PrivateLink traffic filters
editTraffic filtering, to only AWS PrivateLink connections, is one of the security layers available in Elasticsearch Service. It allows you to limit how your deployments can be accessed.
Read more about Traffic Filtering for the general concepts behind traffic filtering in Elasticsearch Service.
PrivateLink filtering is supported only for AWS regions. AWS does not support cross-region PrivateLink connections. Your PrivateLink endpoint needs to be in the same region as your target deployments. Additional details can be found in the AWS VPCE Documentation.
AWS interface VPC endpoints get created in availability zones (AZ). In some regions, our VPC endpoint service is not present in all the possible AZs that a region offers.
You can only choose AZs that are common on both sides. As the names of AZs (for example us-east-1a) differ between AWS accounts, the following list of AWS regions shows the ID (e.g. use1-az4) of each available AZ for the service.
Check interface endpoint availability zone considerations for more details.
Transport client is not supported over PrivateLink connections.
AWS PrivateLink establishes a secure connection between two AWS Virtual Private Clouds (VPCs). The VPCs can belong to separate accounts, i.e. a service provider and its service consumers. AWS routes the PrivateLink traffic within the AWS data center and never exposes it to the public internet. In such a configuration, Elastic Cloud is the third-party service provider and the customers are service consumers.
PrivateLink is a connection between a VPC Endpoint and a PrivateLink Service.
PrivateLink service names and aliases
editPrivateLink Service is set up by Elastic in all supported AWS regions under the following service names:
AWS Public Regions
| Region | VPC Service Name | Private hosted zone domain name | AZ Names (AZ IDs) |
|---|---|---|---|
af-south-1 |
|
|
|
ap-east-1 |
|
|
|
ap-northeast-1 |
|
|
|
ap-northeast-2 |
|
|
|
ap-south-1 |
|
|
|
ap-southeast-1 |
|
|
|
ap-southeast-2 |
|
|
|
ca-central-1 |
|
|
|
eu-central-1 |
|
|
|
eu-central-2 |
|
|
|
eu-south-1 |
|
|
|
eu-north-1 |
|
|
|
eu-west-1 |
|
|
|
eu-west-2 |
|
|
|
eu-west-3 |
|
|
|
me-south-1 |
|
|
|
sa-east-1 |
|
|
|
us-east-1 |
|
|
|
us-east-2 |
|
|
|
us-west-1 |
|
|
|
us-west-2 |
|
|
|
GovCloud Regions
| Region | VPC Service Name | Private hosted zone domain name |
|---|---|---|
us-gov-east-1 (GovCloud) |
|
|
The process of setting up the PrivateLink connection to your clusters is split between AWS (e.g. by using AWS console) and Elastic Cloud UI. These are the high-level steps:
| AWS console | Elastic Cloud |
|---|---|
1. Create a VPC endpoint using Elastic Cloud service name. |
|
2. Create a DNS record pointing to the VPC endpoint. |
|
3. Create a PrivateLink rule set with your VPC endpoint ID. |
|
4. Associate the PrivateLink rule set with your deployments. |
|
5. Interact with your deployments over PrivateLink. |
Ensure your VPC endpoint is in all availability zones supported by Elastic Cloud on the region for the VPC service
editEnsuring that your VPC is in all supported Elastic Cloud availability zones for a particular region avoids potential for a traffic imbalance. That imbalance may saturate some coordinating nodes and underutilize others in the deployment, eventually impacting performance. Enabling all supported Elastic Cloud zones ensures that traffic is balanced optimally.
You can find the zone name to zone ID mapping with AWS CLI:
$ aws ec2 describe-availability-zones --region us-east-1 | jq -c '.AvailabilityZones[] | { id: .ZoneId, name: .ZoneName } ' | sort
{"id":"use1-az1","name":"us-east-1c"}
{"id":"use1-az2","name":"us-east-1e"}
{"id":"use1-az3","name":"us-east-1d"}
{"id":"use1-az4","name":"us-east-1a"}
{"id":"use1-az5","name":"us-east-1f"}
{"id":"use1-az6","name":"us-east-1b"}
The mapping will be different for your region. Our production VPC Service for us-east-1 is located in use1-az2, use1-az4, use1-az6. We need to create the VPC Endpoint for the preceding mapping in at least one of us-east-1a, us-east-1d, us-east-1b.
Create your VPC endpoint and DNS entries in AWS
edit-
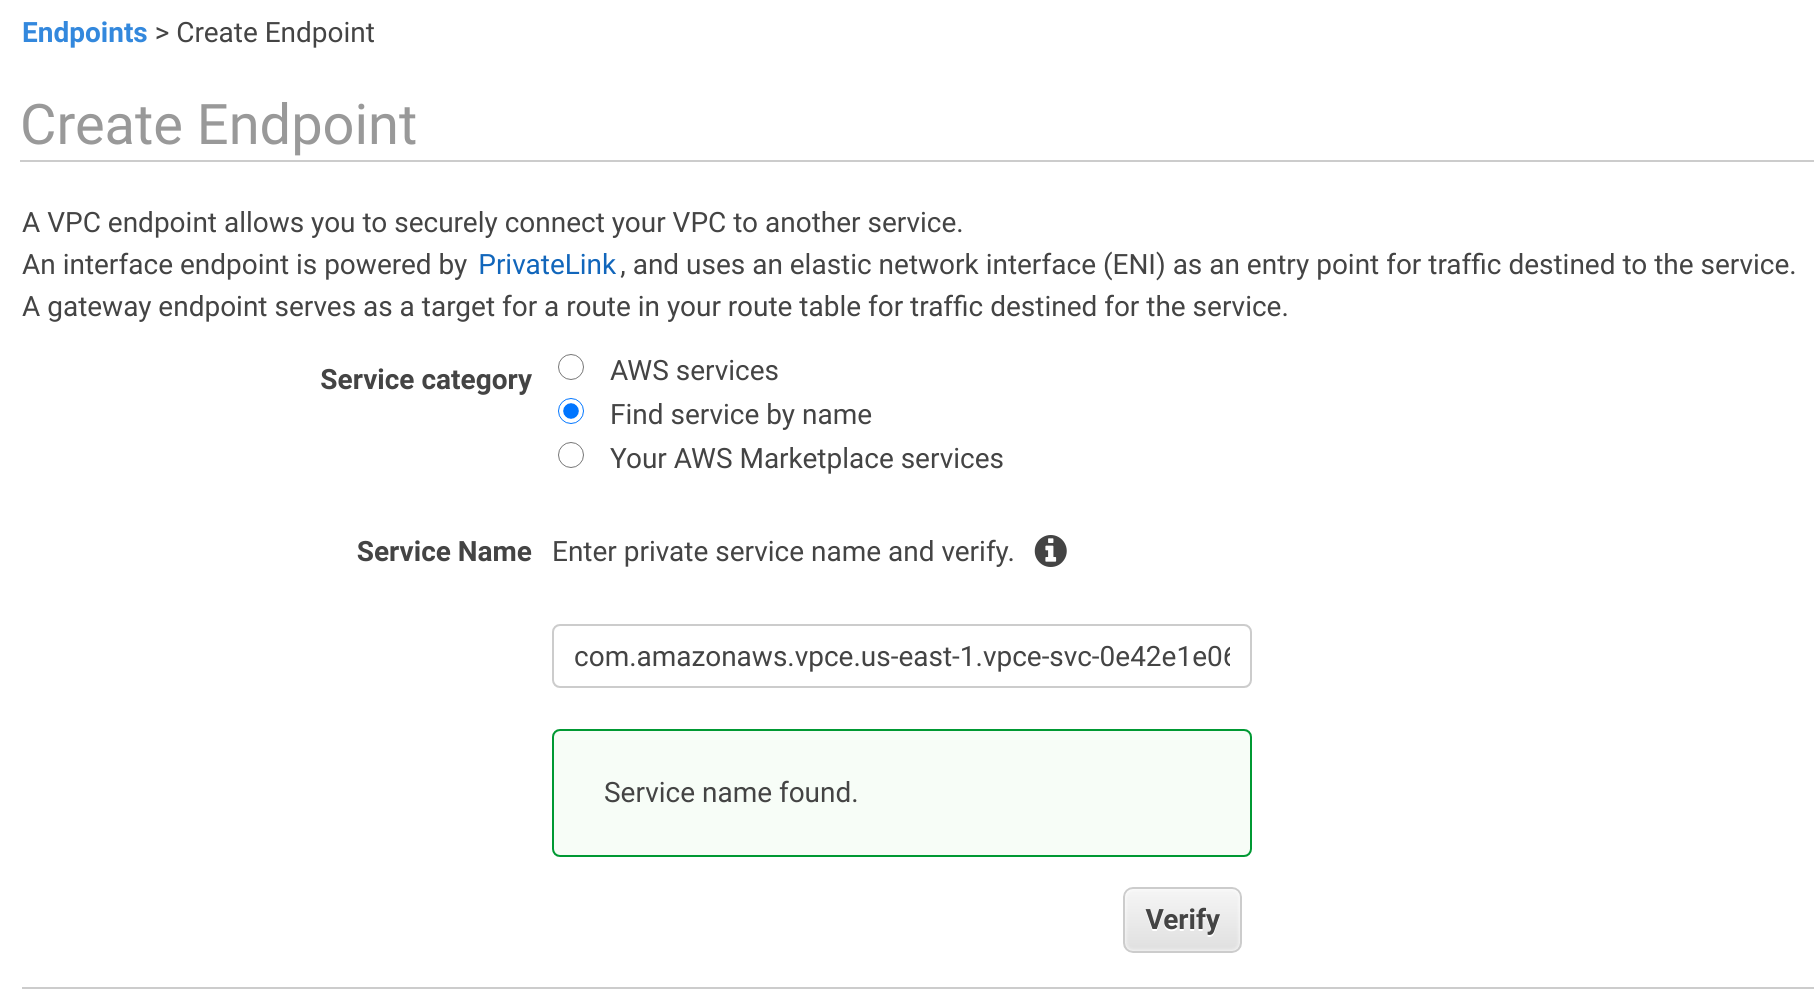
Create a VPC endpoint in your VPC using the service name for your region.
Follow the AWS instructions for details on creating a VPC interface endpoint to an endpoint service.
Use the service name for your region.

The security group for the endpoint should at minimum allow for inbound connectivity from your instances CIDR range on ports 443 and 9243. Security groups for the instances should allow for outbound connnectibity to the endpoint on ports 443 and 9243.
-
Create a DNS record.
-
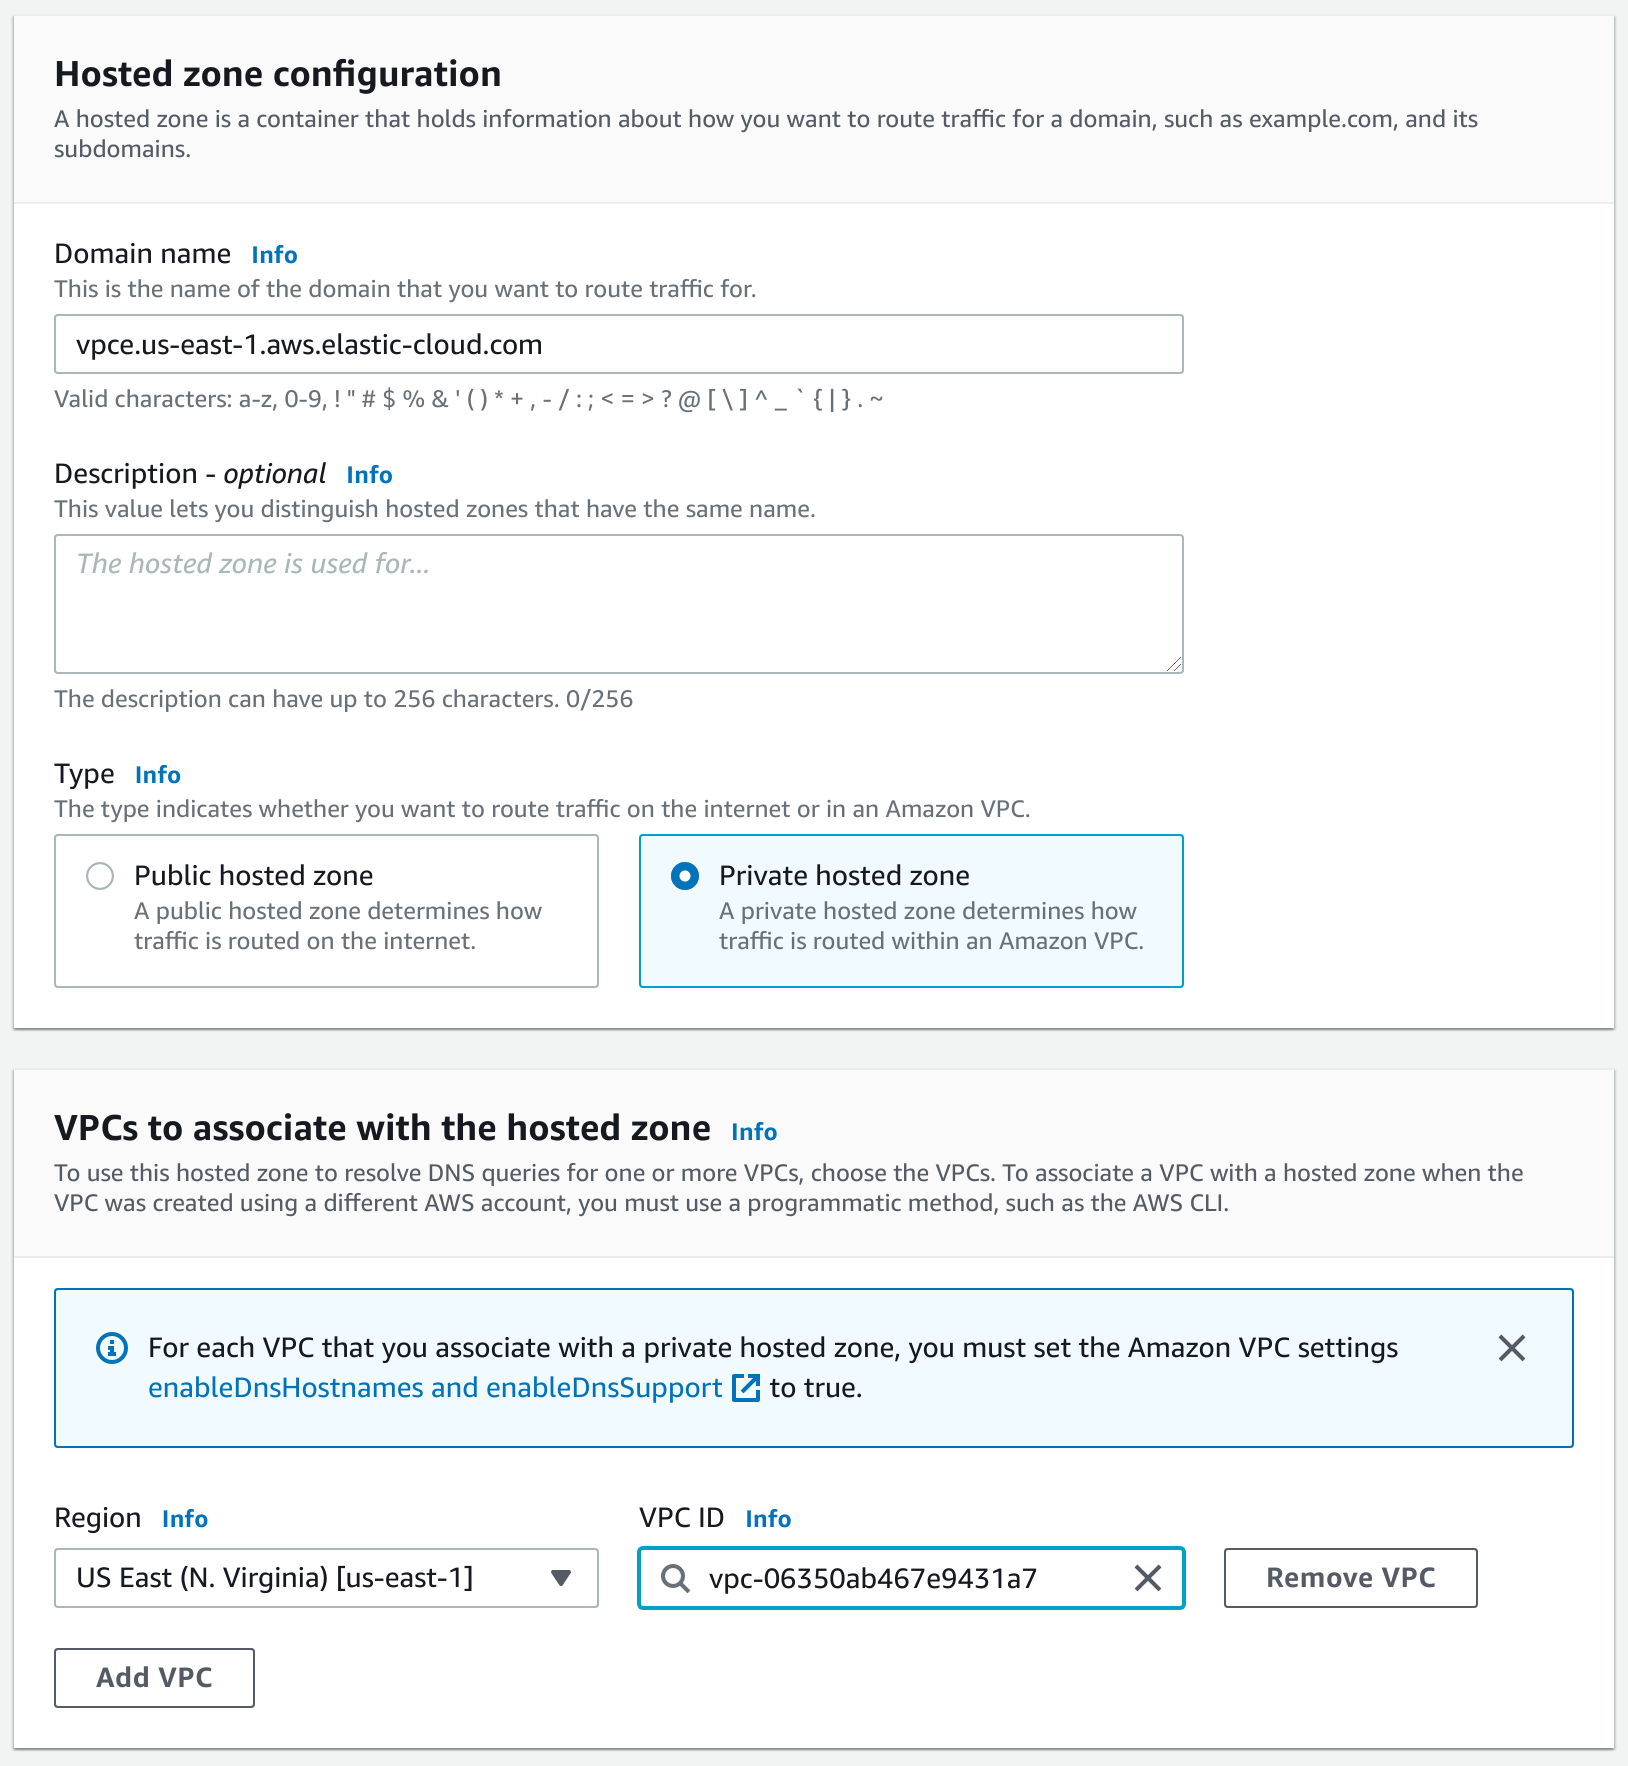
Create a Private hosted zone. Consult Private hosted zone domain name in PrivateLink service names and aliases for the name of the zone. For example, in us-east-1 use
vpce.us-east-1.aws.elastic-cloud.comas the zone domain name. Don’t forget to associate the zone with your VPC.
-
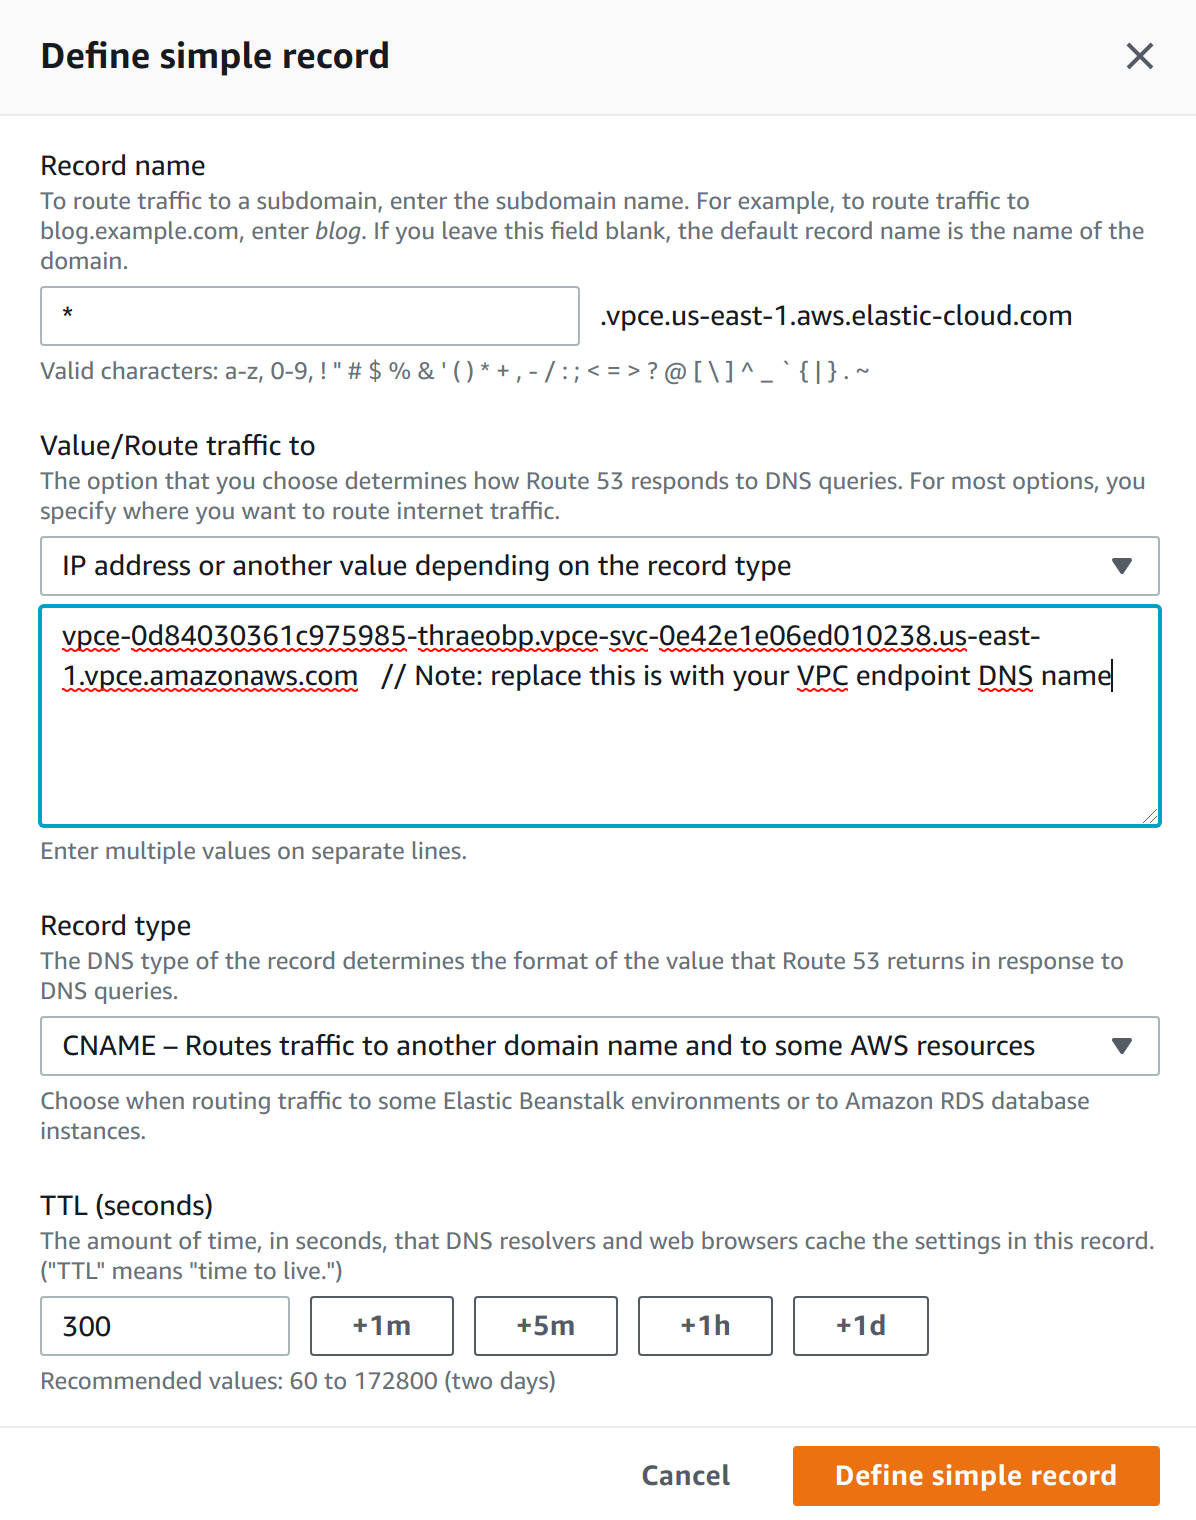
Then create a DNS CNAME alias pointing to the PrivateLink Endpoint. Add the record to a private DNS zone in your VPC. Use
*as the record name, and the VPC endpoint DNS name as a value.Follow the AWS instructions for details on creating a CNAME record which points to your VPC endpoint DNS name.

-
-
Test the connection.
Find out the endpoint of your deployment. You can do that by selecting Copy endpoint in the Cloud UI. It looks something like
my-deployment-d53192.es.us-east-1.aws.found.io.my-deployment-d53192is an alias, andesis the product you want to access within your deployment.To access your Elasticsearch cluster over PrivateLink:
- If you have a custom endpoint alias configured, you can use the custom endpoint URL to connect.
-
Alternatively, use the following URL structure:
https://{alias}.{product}.{private_hosted_zone_domain_name}For example:
https://my-deployment-d53192.es.vpce.us-east-1.aws.elastic-cloud.com
You can use either 443, or 9243 as a port.
You can test the AWS console part of the setup with a following curl (substitute the region and Elasticsearch ID with your cluster):
$ curl -v https://my-deployment-d53192.es.vpce.us-east-1.aws.elastic-cloud.com
..
* Server certificate:
*  subject: CN=*.us-east-1.aws.elastic-cloud.com
*  SSL certificate verify ok.
..
{"ok":false,"message":"Forbidden"}
* Connection #0 to host my-deployment-d53192.es.vpce.us-east-1.aws.elastic-cloud.com left intact
The connection is established, and a valid certificate is presented to the client. The
403 Forbiddenis expected, because you haven’t allowed the traffic over this PrivateLink connection yet.
Add the private link rules to your deployments
editFollow these high-level steps to add private link rules to your deployments.
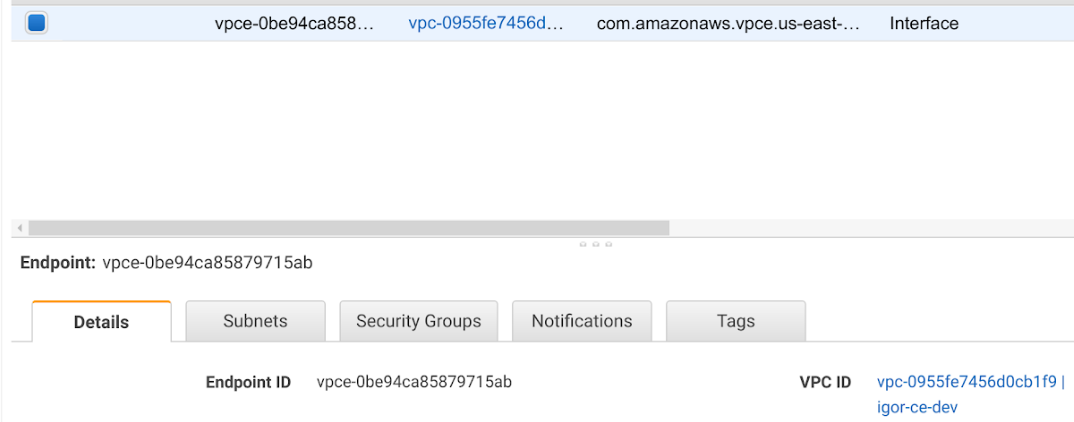
Finding your VPC endpoint ID
editHaving trouble finding your VPC endpoint ID? You can find it in the AWS console.

Create rules with the VPC endpoint
editOnce you know your VPC endpoint ID you can create a private link traffic filter rule set.
- Log in to the Elasticsearch Service Console.
- Find your deployment on the home page in the Elasticsearch Service card and select Manage to access it directly. Or, select Hosted deployments to go to the deployments page to view all of your deployments.
- Under the Features tab, open the Traffic filters page.
- Select Create filter.
- Select Private link endpoint.
- Create your rule set, providing a meaningful name and description.
- Select the region for the rule set.
- Enter your VPC endpoint ID.
-
Select if this rule set should be automatically attached to new deployments.
Each rule set is bound to a particular region and can be only assigned to deployments in the same region.
- (Optional) You can claim your VPC endpoint ID, so that no other organization is able to use it in a traffic filter ruleset.
The next step is to associate the rule set with your deployments.
Associate a PrivateLink rule set with your deployment
editTo associate a private link rule set with your deployment:
- Go to the deployment.
- On the Security page, under Traffic filters select Apply filter.
- Choose the filter you want to apply and select Apply filter.
Access the deployment over a PrivateLink
editFor traffic to connect with the deployment over a PrivateLink, the client making the request needs to be located within the VPC where you’ve created the VPC endpoint. You can also setup network traffic to flow through the originating VPC from somewhere else, such as another VPC or VPN from your corporate network. This assumes that the VPC endpoint and the DNS record are also available within that context. Check your service provider documentation for setup instructions.
Use the alias you’ve set up as CNAME DNS record to access your deployment.
If your deployment alias is my-deployment-12ab9b and it is located in us-east-1 region you can access it under https://my-deployment-12ab9b.es.vpce.us-east-1.aws.elastic-cloud.com.
$ curl -u 'username:password' -v https://my-deployment-d53192.es.vpce.us-east-1.aws.elastic-cloud.com
..
< HTTP/1.1 200 OK
..
If you are using AWS PrivateLink together with Fleet, and enrolling the Elastic Agent with a PrivateLink URL, you need to configure Fleet Server to use and propagate the PrivateLink URL by updating the Fleet Server hosts field in the Fleet settings section of Kibana. Otherwise, Elastic Agent will reset to use a default address instead of the PrivateLink URL. The URL needs to follow this pattern: https://<Fleet component ID/deployment alias>.fleet.<Private hosted zone domain name>:443.
Similarly, the Elasticsearch host needs to be updated to propagate the Privatelink URL. The Elasticsearch URL needs to follow this pattern: https://<Elasticsearch cluster ID/deployment alias>.es.<Private hosted zone domain name>:443.
The settings xpack.fleet.agents.fleet_server.hosts and xpack.fleet.outputs that are needed to enable this configuration in Kibana are currently available on-prem only, and not in the Kibana settings in Elastic Cloud.
Edit a PrivateLink connection
editYou can edit a rule set name or to change the VPC endpoint ID.
- Log in to the Elasticsearch Service Console.
- Find your deployment on the home page in the Elasticsearch Service card and select Manage to access it directly. Or, select Hosted deployments to go to the deployments page to view all of your deployments.
- Under the Features tab, open the Traffic filters page.
- Find the rule set you want to edit.
- Select the Edit icon.
Delete a PrivateLink rule set
editIf you need to remove a rule set, you must first remove any associations with deployments.
To delete a rule set with all its rules:
- Remove any deployment associations.
- Under the Features tab, open the Traffic filters page.
- Find the rule set you want to edit.
- Select the Remove icon. The icon is inactive if there are deployments assigned to the rule set.
Remove a PrivateLink rule set association from your deployment
editTo remove an association through the UI:
- Go to the deployment.
- On the Security page, under Traffic filters select Remove.