Scheduling Cloud SQL exports using Cloud Functions and Cloud Scheduler
Jonathan Simon
Developer Programs Engineer, Google Cloud
Cloud SQL offers an easy way to perform a database export for any of your databases right from the Cloud Console. Database export files are saved to Google Cloud Storage and can be used via the Cloud SQL import process to be recreated as new databases.


Creating a one-time export file is good but setting up an automated process to do this weekly is even better. This blog post will walk through the steps required to schedule a weekly export of a Cloud SQL database to Cloud Storage. I’ll use a SQL Server instance for this example but the overall approach will also work for MySQL and PostgreSQL databases in Cloud SQL.
First you will need to create a SQL Server instance in Cloud SQL which you can do from the Google Cloud Console.
For the full details on creating the SQL Server instance and connecting to it using Azure Data Studio see my previous post: Try out SQL Server on Google Cloud at your own pace
Create database and table
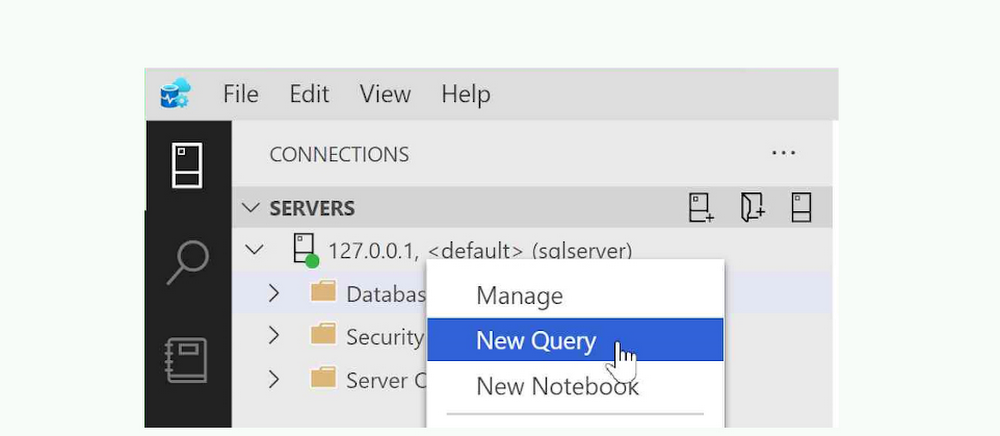
We’ll start by creating a new database on our SQL Server instance. With Azure Data Studio connected to your SQL Server instance, right click the server in Azure Data Studio and select “New Query”.

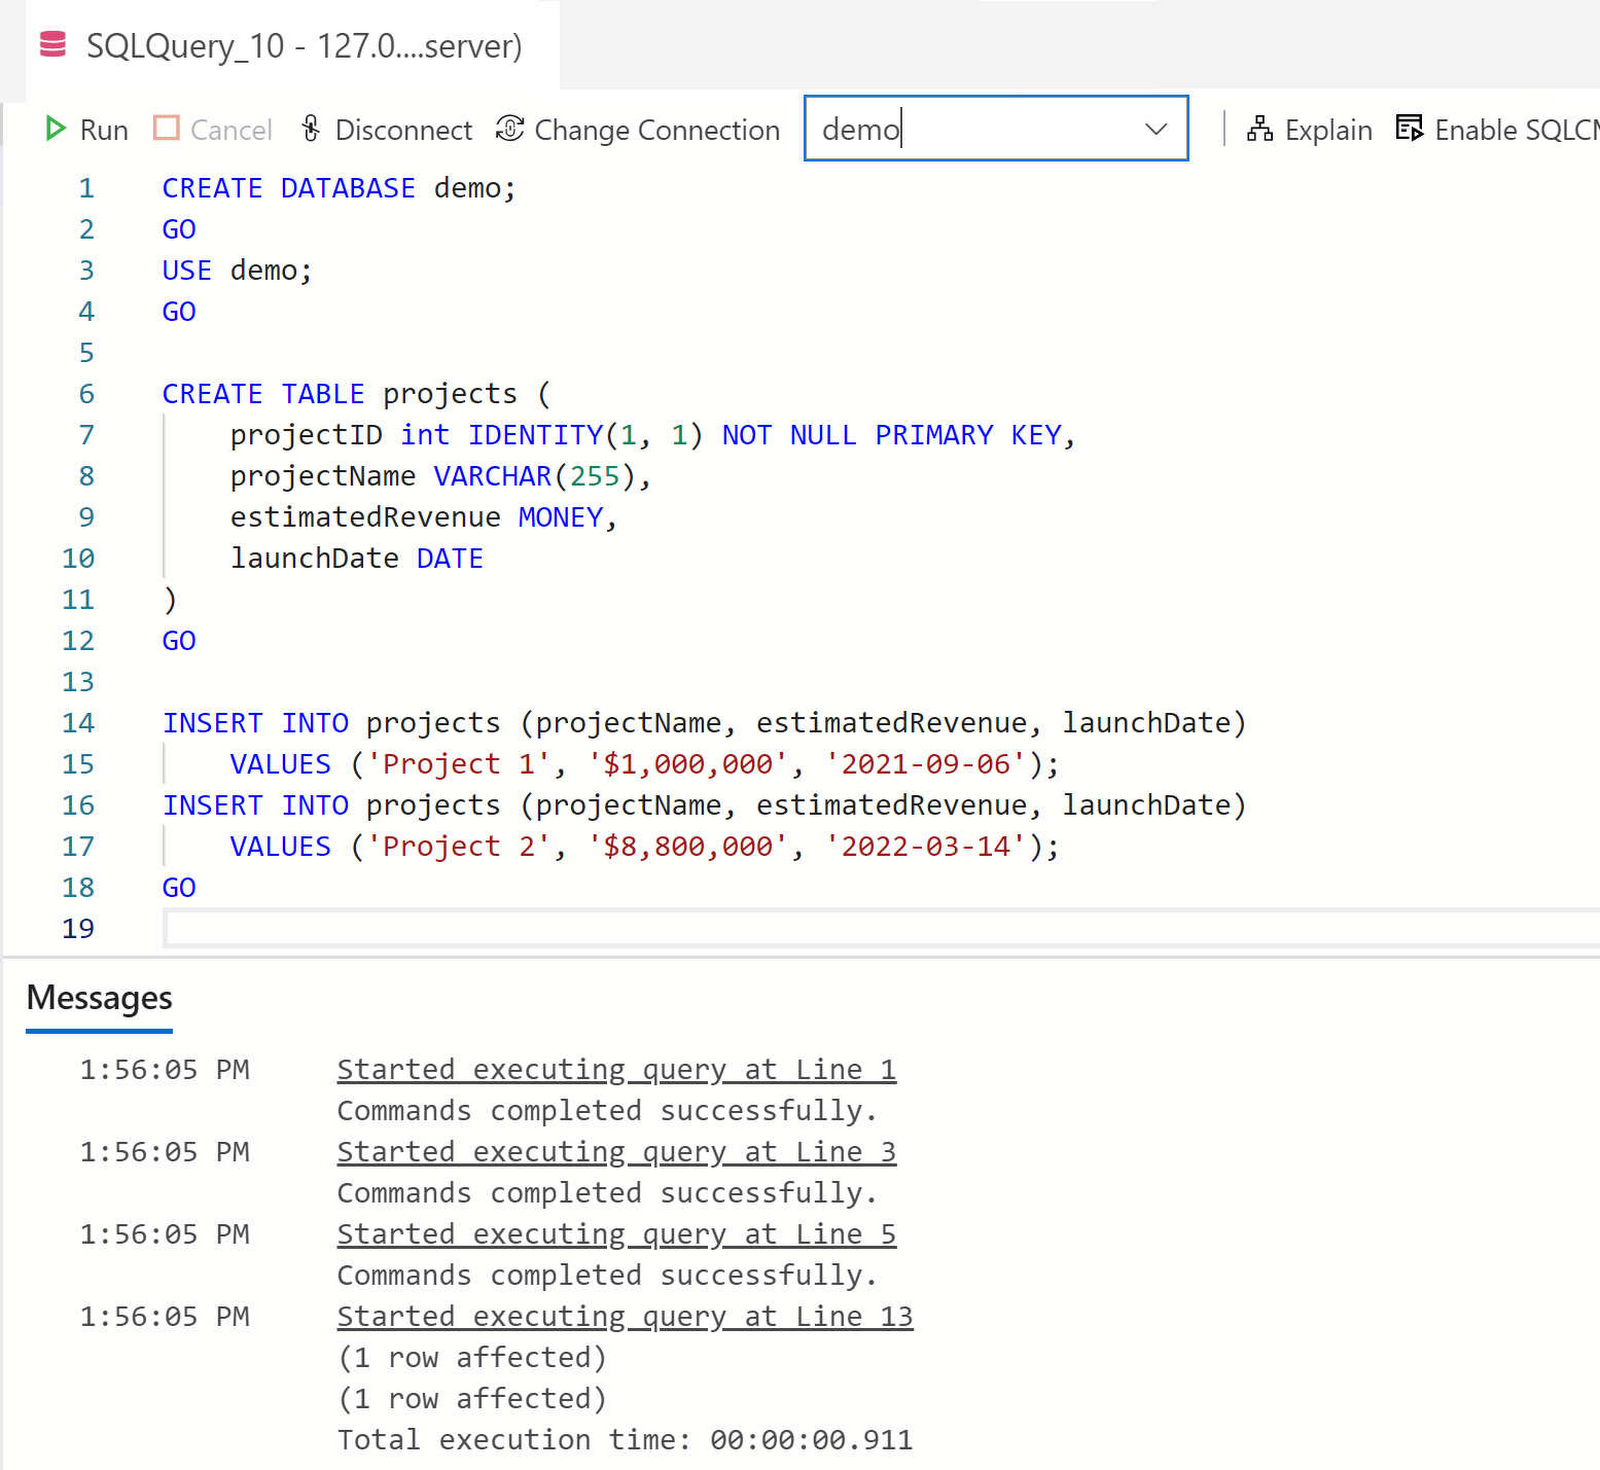
Enter the following SQL statements to create a new database and a new table containing data to work with:
and click the “Run” button.

Create a bucket in Google Cloud Storage
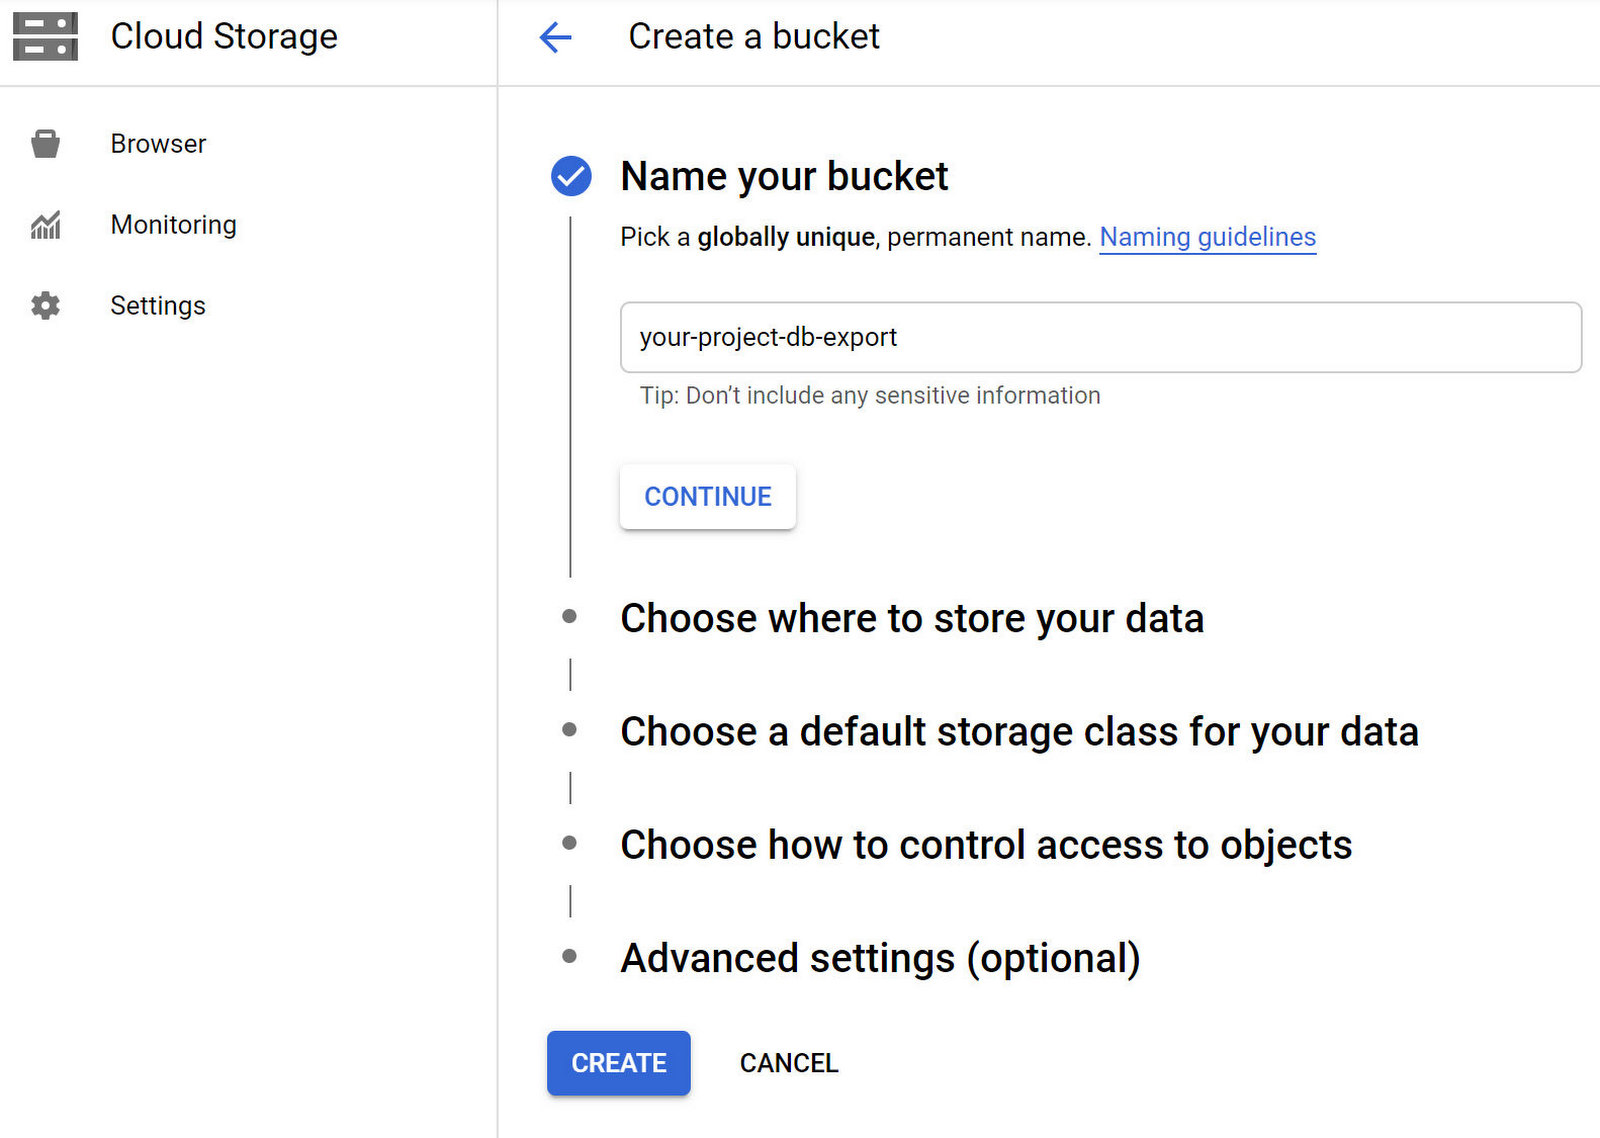
Now let’s begin the process of scheduling a weekly export of that database to Cloud Storage. We’ll start by creating a Cloud Storage bucket that will contain our database export files. Go to the Cloud Storage section of the Cloud Console and click “CREATE BUCKET” button. Enter a “Name” for your bucket and click the “CREATE” button.

Okay, now that we’ve got a bucket to save our export files to, we need to give our Cloud SQL instance access to write files to that bucket. We can do that by granting the Service Account of our Cloud SQL instance permission to create objects in the new bucket. First we need to copy the service account address from the Cloud SQL instance details page. Go to the Cloud SQL instances page and select your instance. Then on the details page, scroll down and copy the “Service account”.
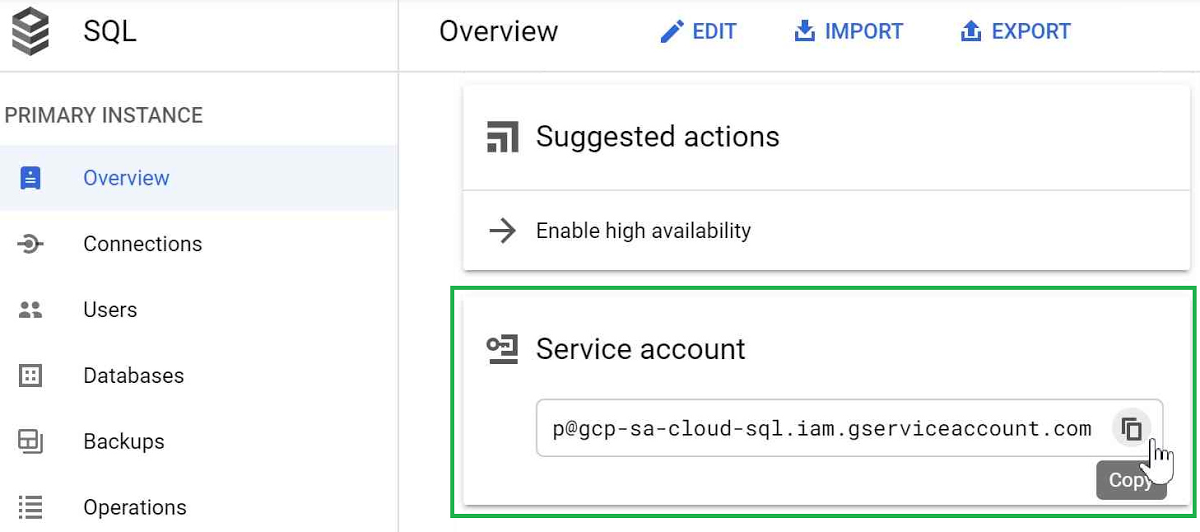

With the “Service account” on your clipboard, go back to your bucket in Cloud Storage and click its “Permissions” tab.
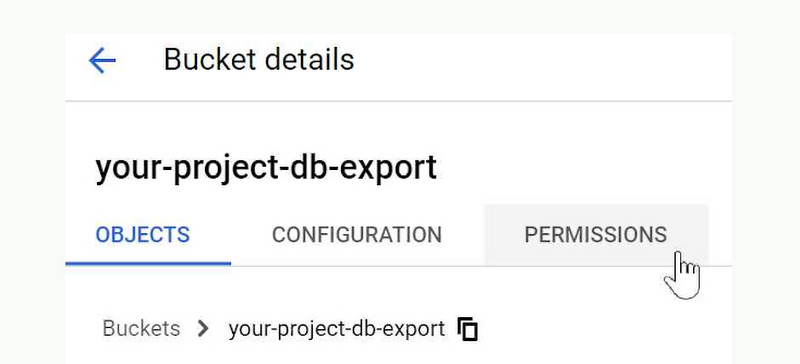

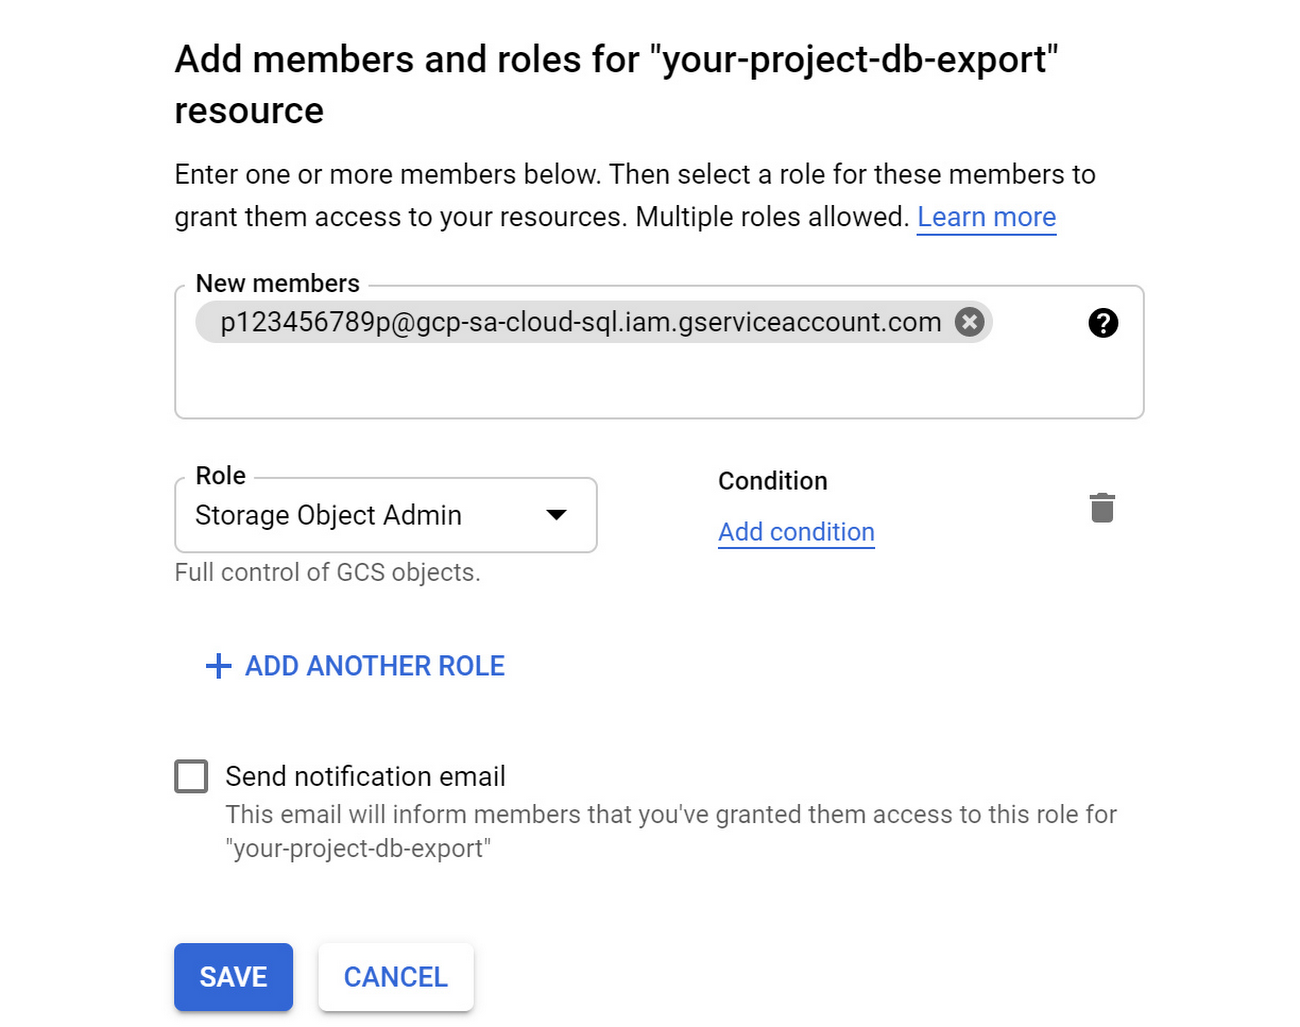
Click the “Add” button to add permissions to the Cloud Storage bucket.


Add the copied “Service account” and select “Cloud Storage - Storage Object Admin” for the “Role”. Click the “Save” button.

Now since we will be exporting a Cloud SQL export file every week, let’s be frugal and use Cloud Storage Object Lifecycle Management to change the storage class of these export files over time so that their storage price costs less. We can do that by selecting the “Lifecycle” tab for our Cloud Storage bucket.


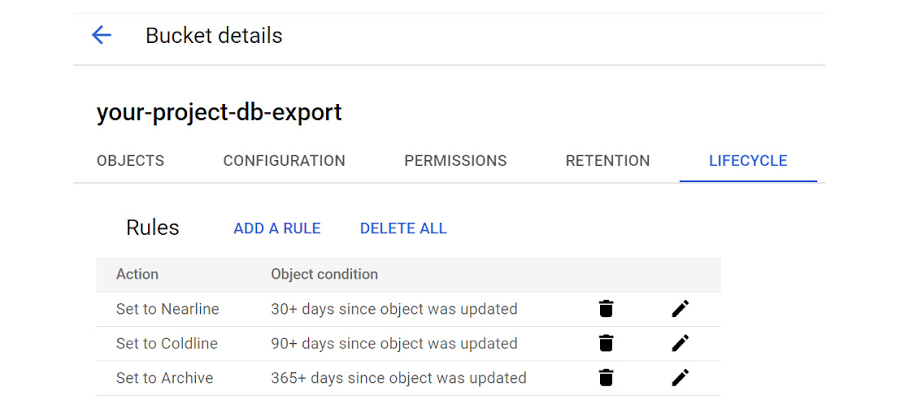
We’re going to set three Lifecycle rules for the bucket so that export files over a month old are converted to “Nearline” storage, export files over three months old are converted to “Coldline” storage, and files over a year old will be converted to the most affordable “Archive” storage class. By taking the few extra steps to do this we’ll significantly reduce the cost of storage for the export files over time.
Click the “ADD A RULE” button and add a rule to change the storage class of objects older than 30 days to Nearline storage.
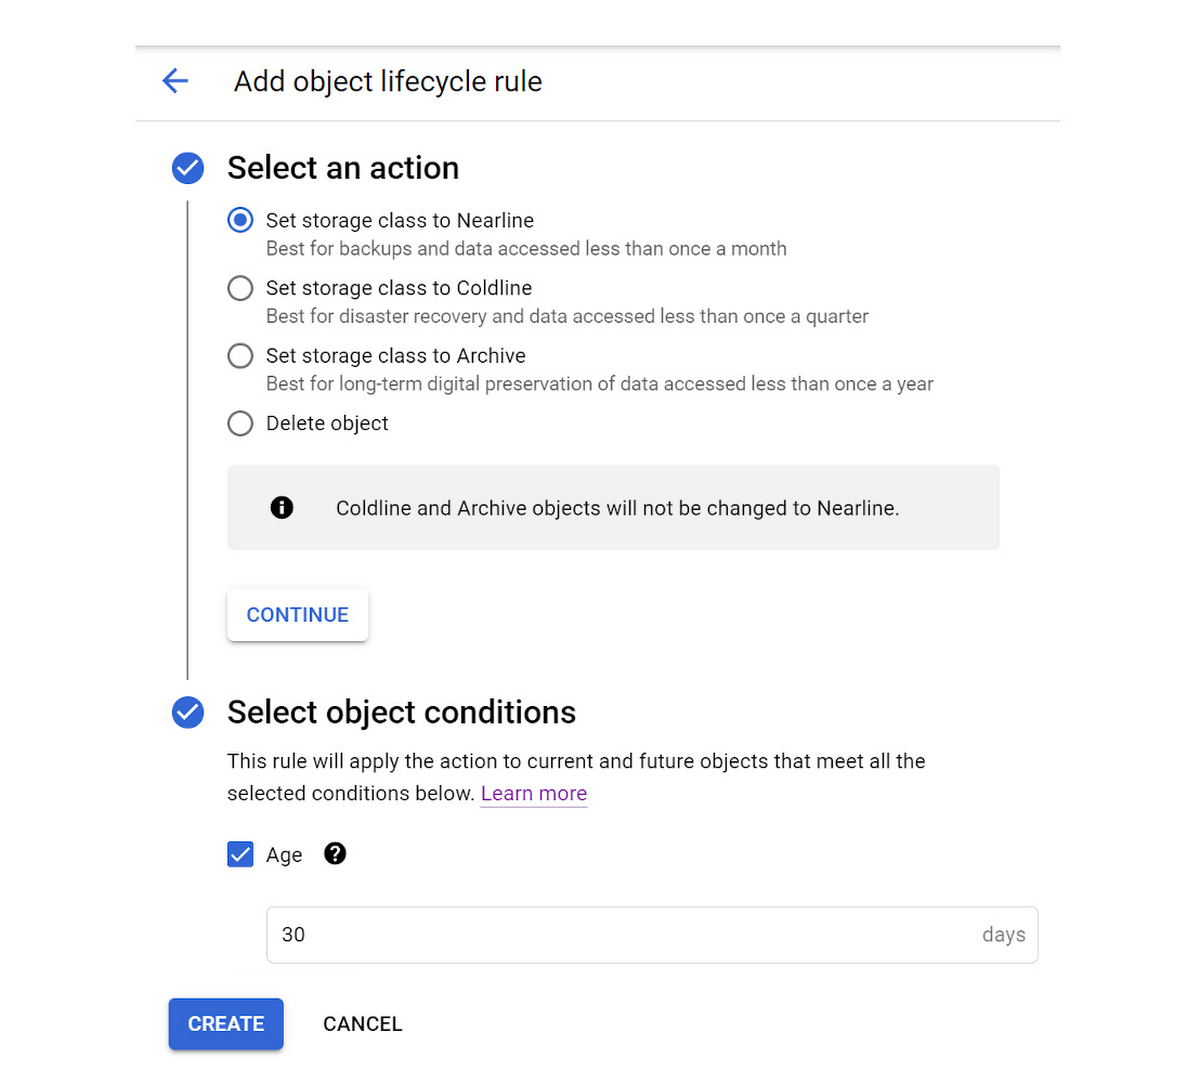

Again, click the “ADD A RULE” button and add a rule to change the storage class of objects older than 90 days to Coldline storage.
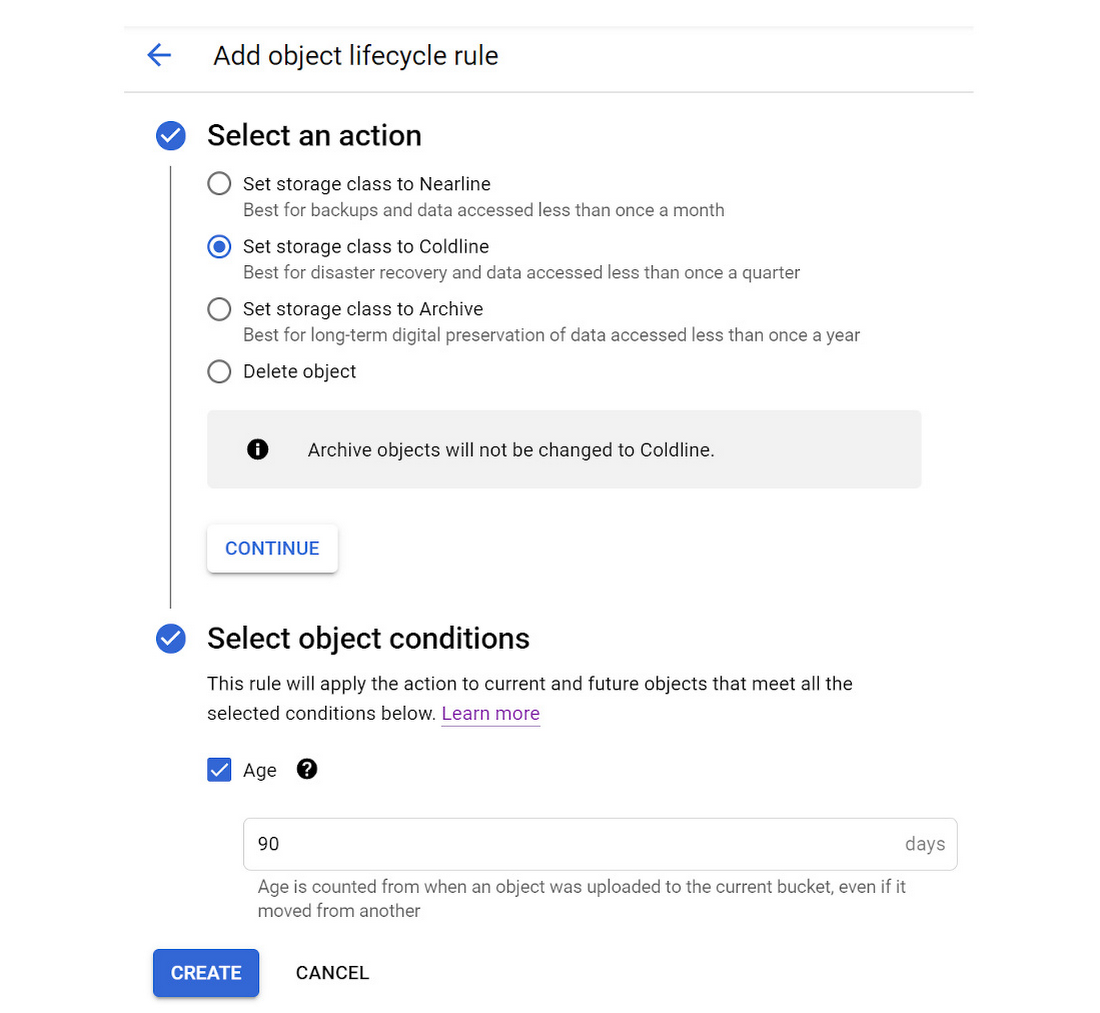

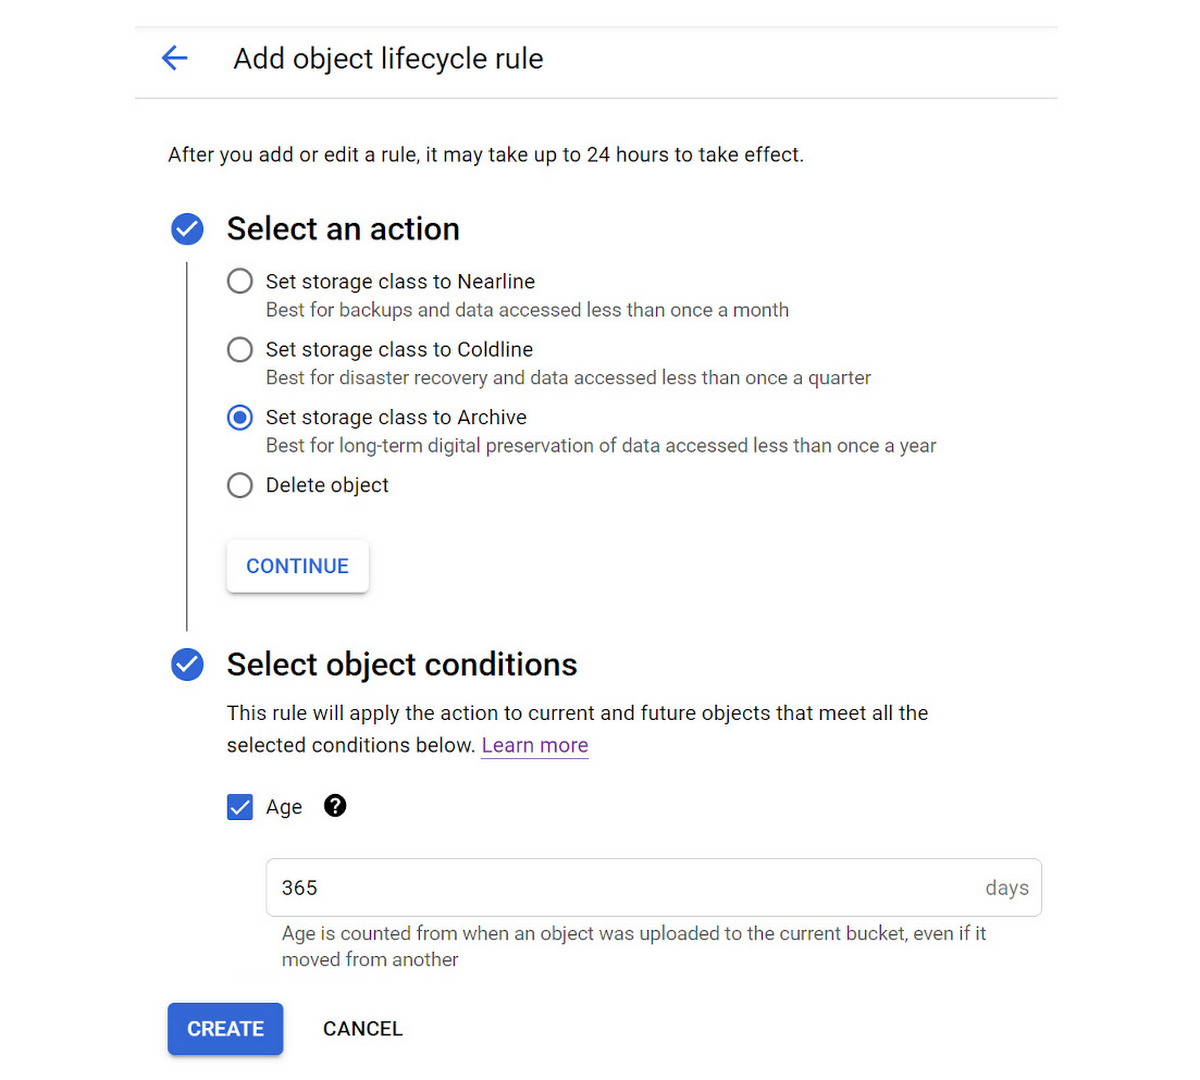
Click the “ADD A RULE” button one more time to add a rule to change the storage class of objects older than 365 days to Archive storage.

Once you’ve added the 3 rules, the Lifecycle settings for the bucket should look something like this:

Create Cloud Function to export a Cloud SQL database
With a Cloud Storage bucket ready to accept export files, we’ll now move on to creating a Cloud Function that can call the export method for a Cloud SQL database.
Start this step in the Cloud Functions section of the Cloud Console. Click the “CREATE FUNCTION” button to start the creation process. Enter the following information:
Specify an Function name:
Example: export-cloud-sql-db
Select a Region where the Function will run:
Example: us-west2
For Trigger type select “Cloud Pub/Sub”. We’ll create a new Pub/Sub Topic named “DatabaseMgmt” to be used for Cloud SQL instance management. Within the “Select a Cloud Pub/Sub Topic” drop-down menu, click the “CREATE A TOPIC” button. In the “Create a Topic” dialog window that appears, enter “DatabaseMgmt” as the “Topic ID” and click the “CREATE TOPIC” button. Then click the “SAVE” button to set “Cloud Pub/Sub” as the “Trigger” for the Cloud Function.
Next, expand the “Runtime, Build and Connector Settings” section and click “Connections”.
For “Ingress settings”, select “Allow internal traffic only”.
For “Egress settings”, click the “CREATE A CONNECTOR” button. This opens an additional browser tab and starts the flow for “Serverless VPC access” in the Networking section of the Cloud Console. The first time this is done in a GCP project, you will be redirected to a screen where you have to enable the “Serverless VPC access API”. Enable it and continue with the process of creating the VPC connector. Below is an example of the completed form used to create a VPC connector:
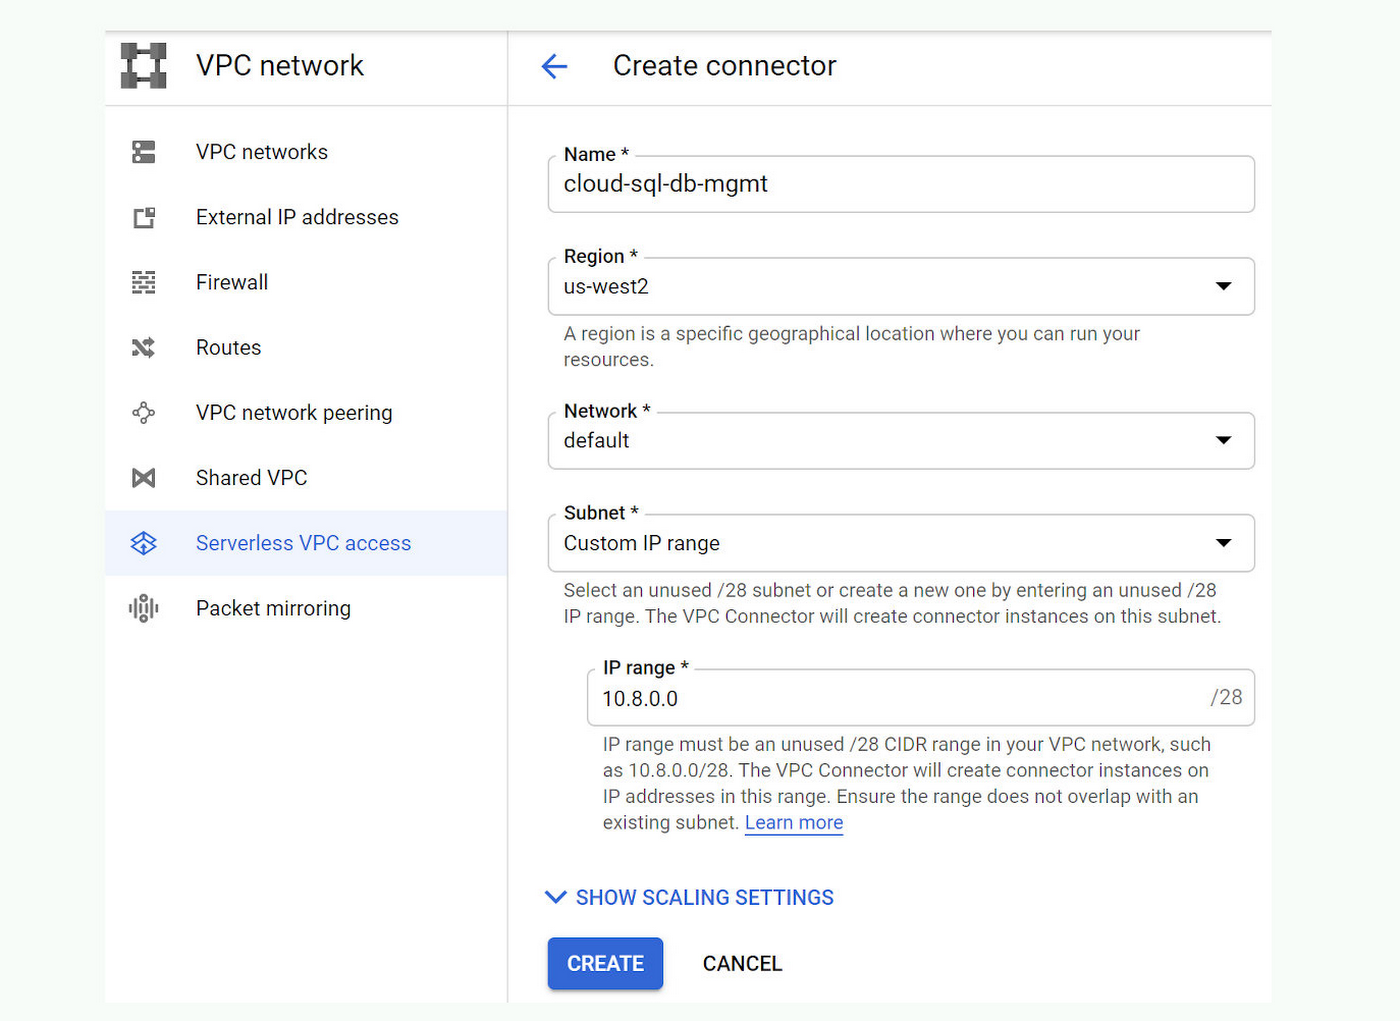

For “Name” enter: “cloud-sql-db-mgmt”
For “Region” select: “us-west2”
In the “Network” drop-down menu, select “default”.
For “Subnet” select “Custom IP Range” and enter “10.8.0.0” as the “IP range”.
Then click the “CREATE” button and wait for a minute or so for the Serverless VPC access connector to be created. Once the connector has been created, go back to the other browser tab where the Cloud Function creation form is still open. Now we can enter “cloud-sql-db-mgmt” as the “VPC connector” in the “Egress settings” section.
Also under “Egress settings” select the “Route all traffic through the VPC connector” option.
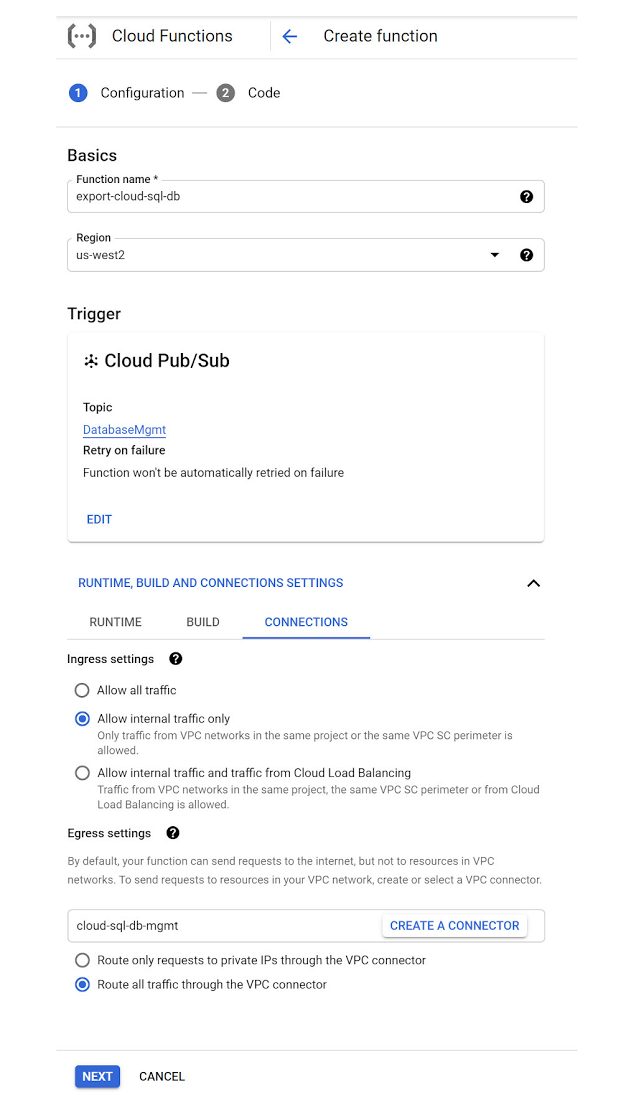

Click the “NEXT” button at the bottom of the “Create function” form to move on to the next step where we enter the code that will power the function.
Now in the “Code” step of the “Create function” form, select “Go 1.13” as the “Runtime” and enter “ProcessPubSub” as the code “Entry point”.
Then copy and paste the following code into the code section of the “Source code — Inline Editor”:
The completed “Code” section of the “Create function” form should look something like this:
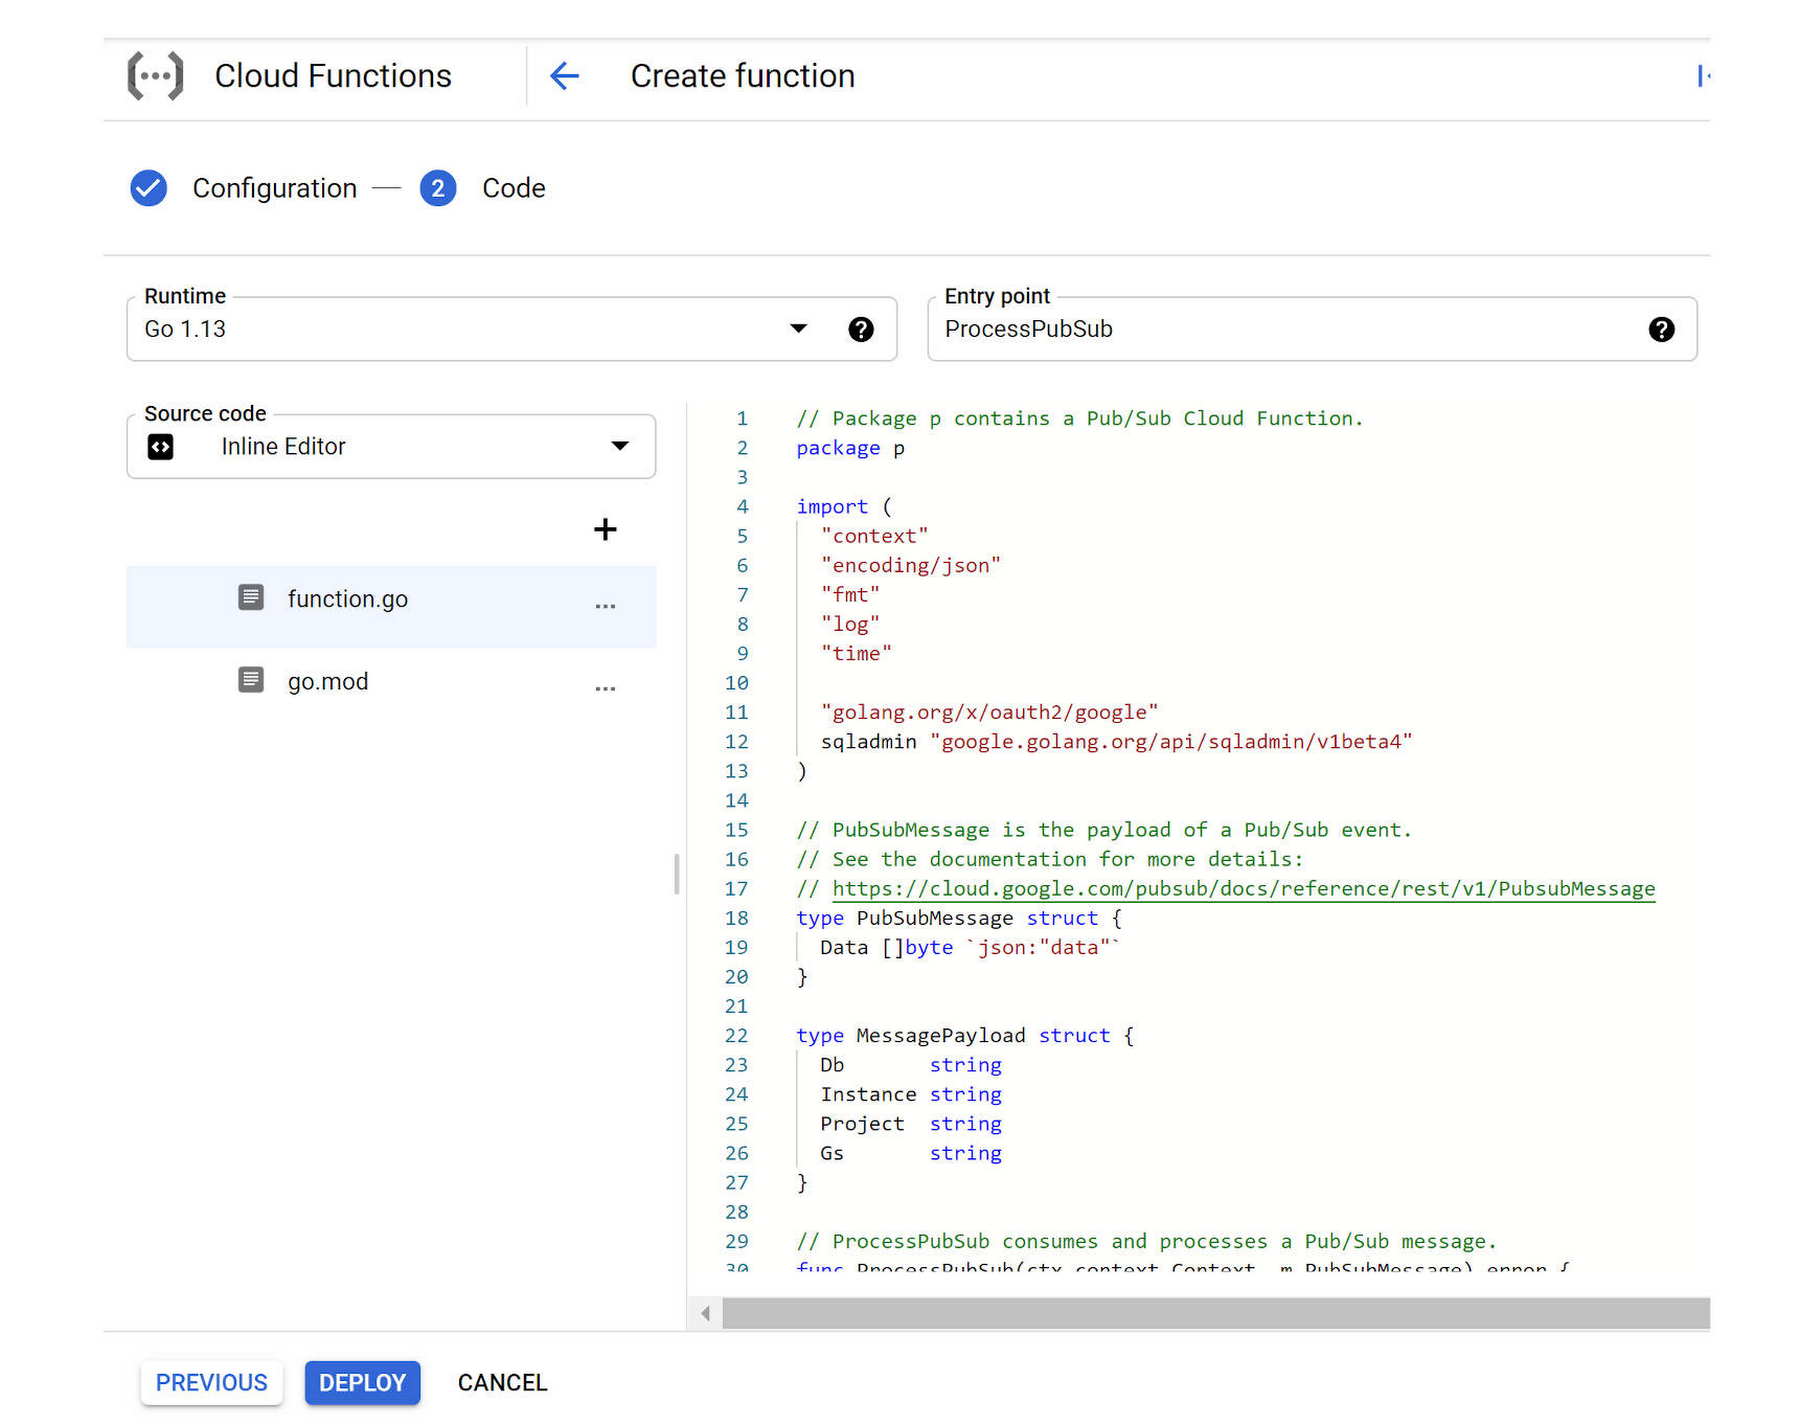

Click the “DEPLOY” button to deploy the Function. The deployment process will take a couple of minutes to complete.
Grant Permission for the Cloud Function to access Cloud SQL export
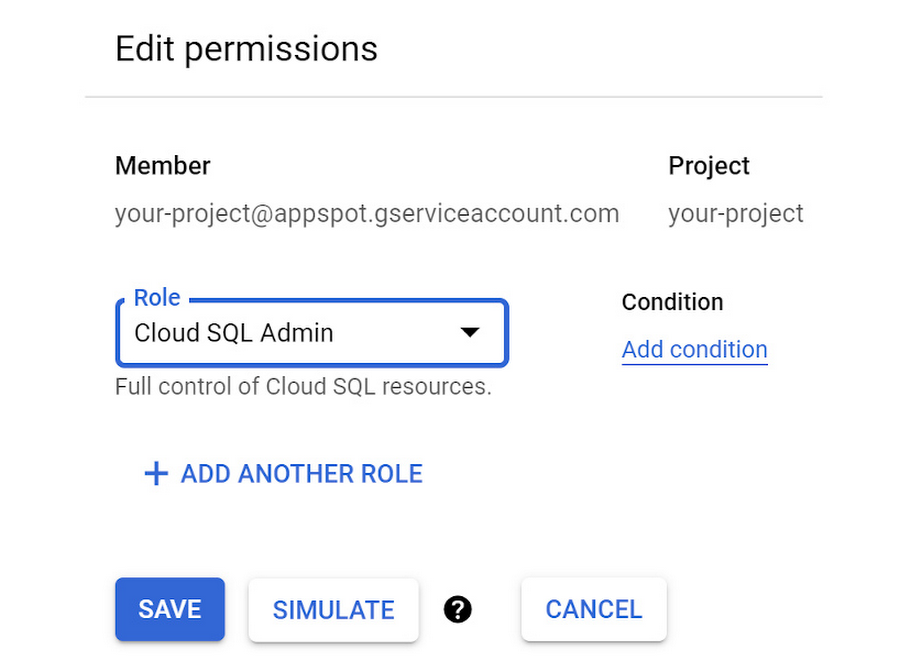
The final setup step to enable our Cloud Function to be fully functional is to grant the necessary permission to allow the Cloud Function Service account to run Cloud SQL Admin methods (like database export and import operations).
Go to the IAM section of the Cloud Console, which is where permissions for service accounts are managed. Find the service account used by Cloud Functions which is the “App Engine default service account”. It has the suffix: “@appspot.gserviceaccount.com”. Click the Edit icon for the account which looks like a pencil.


In the “Edit permissions” dialog window, click the “ADD ANOTHER ROLE” button. Select the “Cloud SQL Admin” role to be added and click the “SAVE” button.

Test out the Cloud Function
Sweet! Our Function is now complete and ready for testing. We can test out the Cloud Function by posting a message to the Pub/Sub Topic to trigger its call of the Cloud SQL export operation.
Go to the Cloud Pub/Sub section of the Cloud Console. Select the “DatabaseMgmt” Topic. Click the “PUBLISH MESSAGE” button.
Enter the following JSON formatted text into the “Message” input area of the “Message body” section of the “Publish message” form. Be sure and replace the values for “<your-instance-name>”, “<your-project-id>” and “<your-gcs-bucket>” with the values that you chose when you created those resources:
The Pub/Sub message to be published should look something like this:
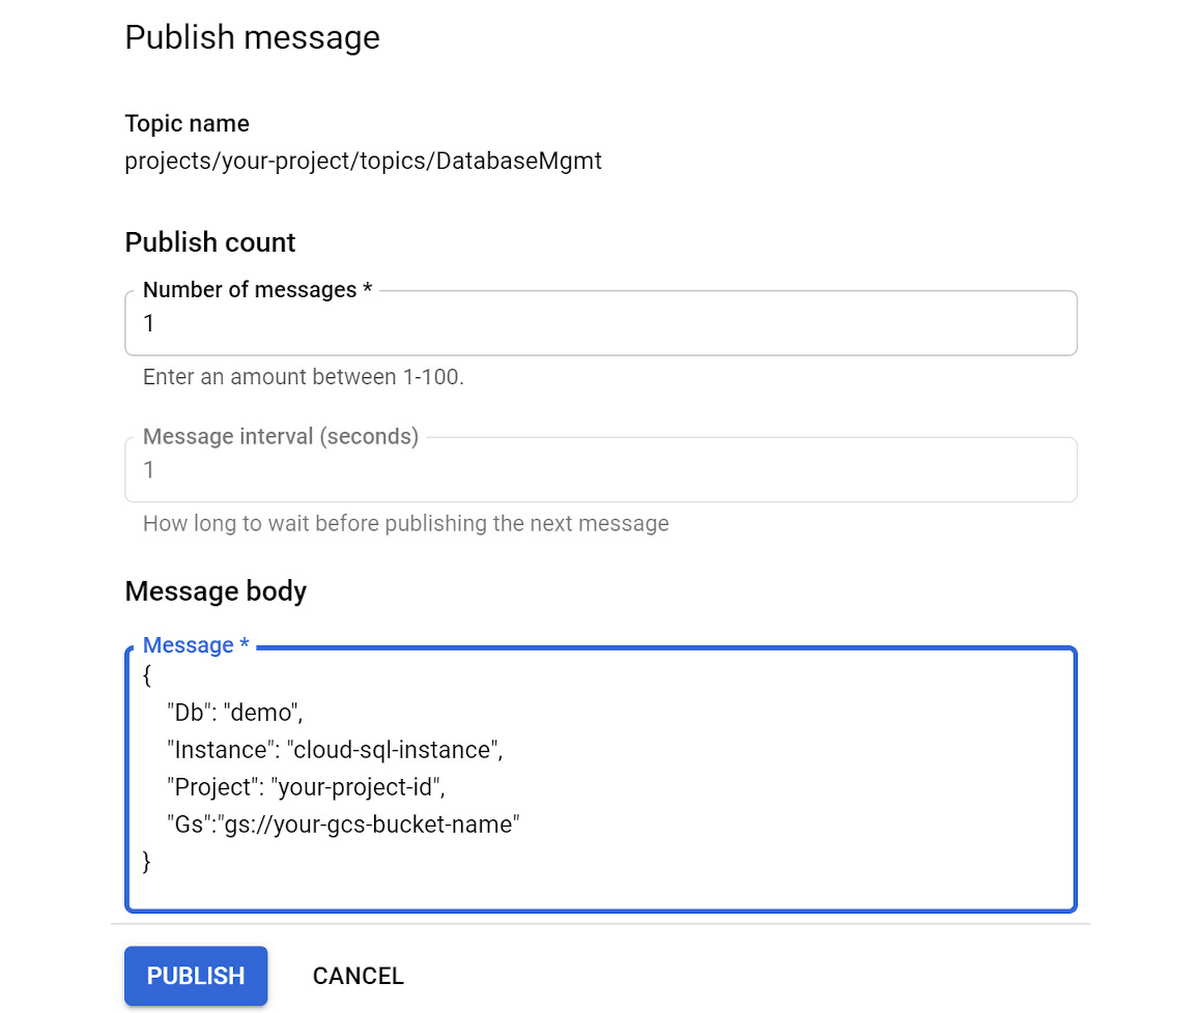

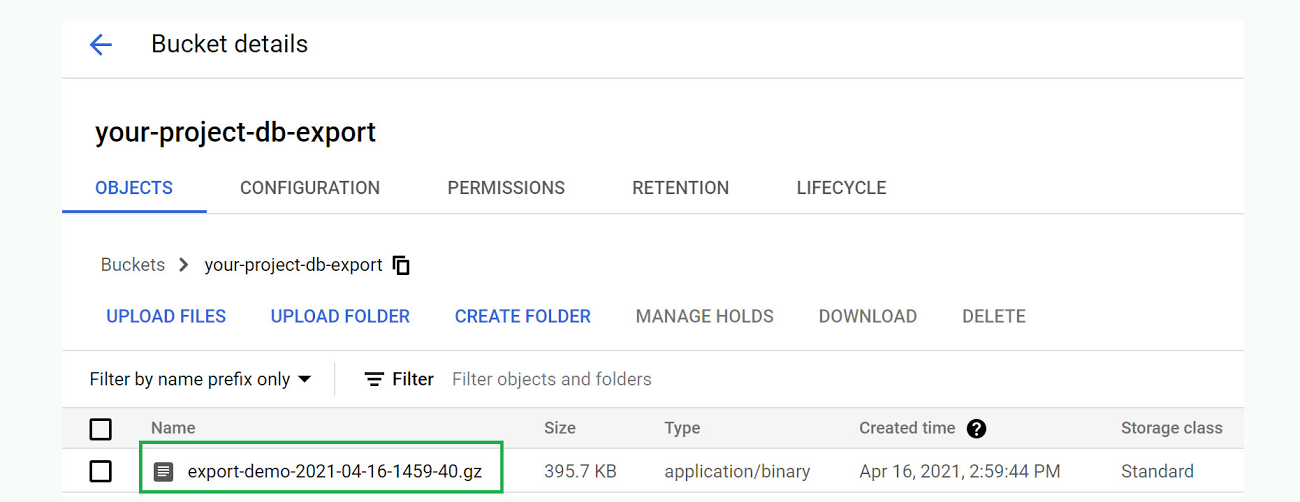
Click the “PUBLISH” button to publish the message, which should trigger the Cloud Function. We can confirm that everything works as expected by viewing the Cloud Storage bucket specified in the message body. There should now be a file in it named something like “ export-demo-2021–04–16–1459–40.gz”.

Create Cloud Scheduler Job to trigger the Cloud Function once a week
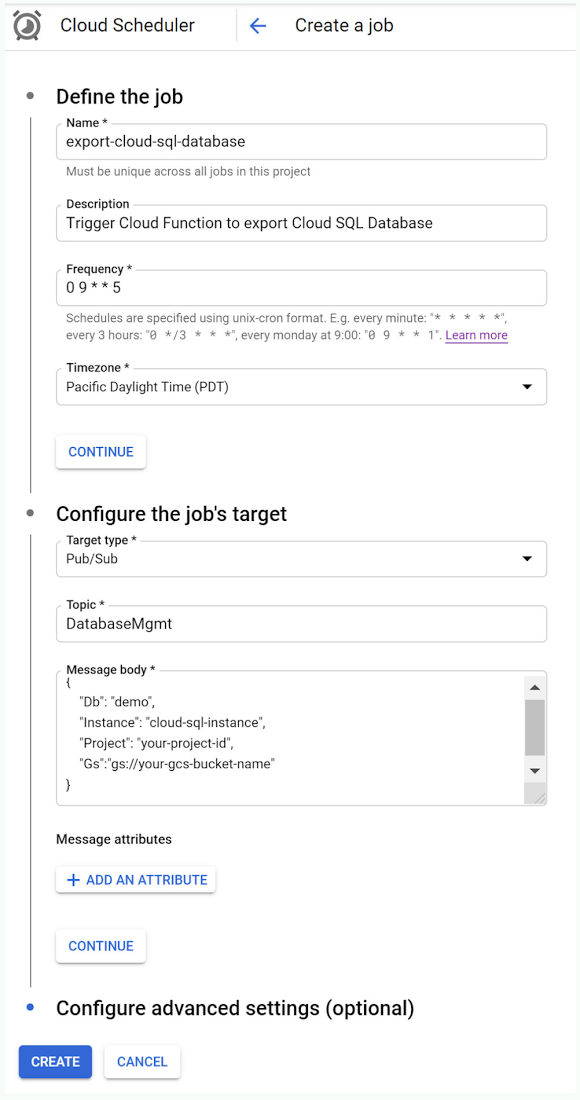
Excellent! Now that we’ve confirmed our Cloud Function is working as expected, let’s use Cloud Scheduler to create a job that triggers the Cloud Function once a week. Go to the Cloud Scheduler section of the Cloud Console and click the “SCHEDULE A JOB” button.
Enter a “Name” for the scheduled job:
Example: export-cloud-sql-database
Enter a “Description” for the scheduled job:
Example: Trigger Cloud Function to export Cloud SQL Database
For the “Frequency” of when the job should be run, enter “0 9 * * 5” which schedules the job to be run once a week every Friday at 9:00 am. You should set the frequency to be a schedule that is best for your needs. For more details about setting the frequency see the Cloud Scheduler documentation.
Under the “Configure the Job’s Target” section, select the “Target type” to be “Pub/Sub”.
For the “Topic” specify “DatabaseMgmt”, the Pub/Sub topic created in an earlier step.
For the “Message body” enter the same JSON message you used when you tested the Cloud Function earlier in this post. Be sure and replace the values for “<your-instance-name>”, “<your-project-id>” and “<your-gcs-bucket>” with the values that you chose when you created those resources.
The completed “Create a job” form should look something like this:

With all that information supplied, click the “CREATE” button to create the Cloud Scheduler job. After the job creation completes you’ll see the job list displayed which includes a handy “RUN NOW” button to test out the scheduled job immediately.


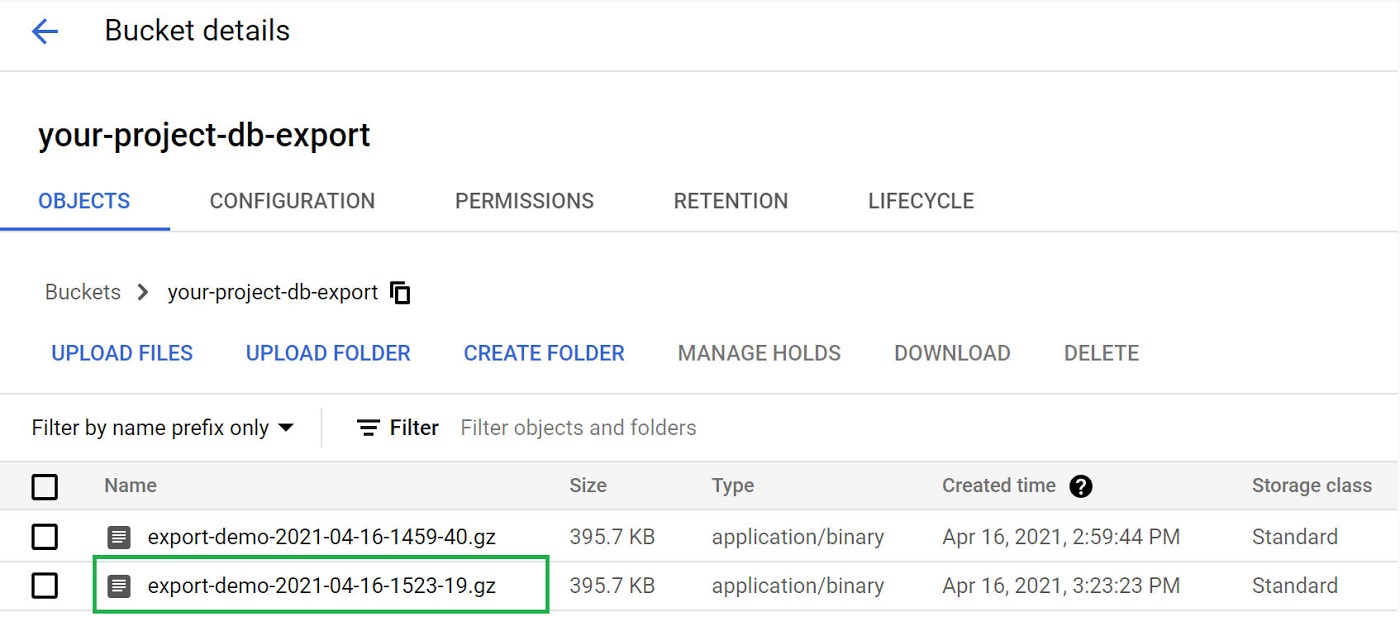
Go ahead and click the “RUN NOW” button to see a new export file get created in your Cloud Storage bucket while you experience the pleasant gratification of all your good work to set up automated exports of your Cloud SQL database. Well done!

Next steps
Now, read more about exporting data in Cloud SQL and create a SQL Server instance in Cloud SQL which you can do from the Google Cloud Console.
